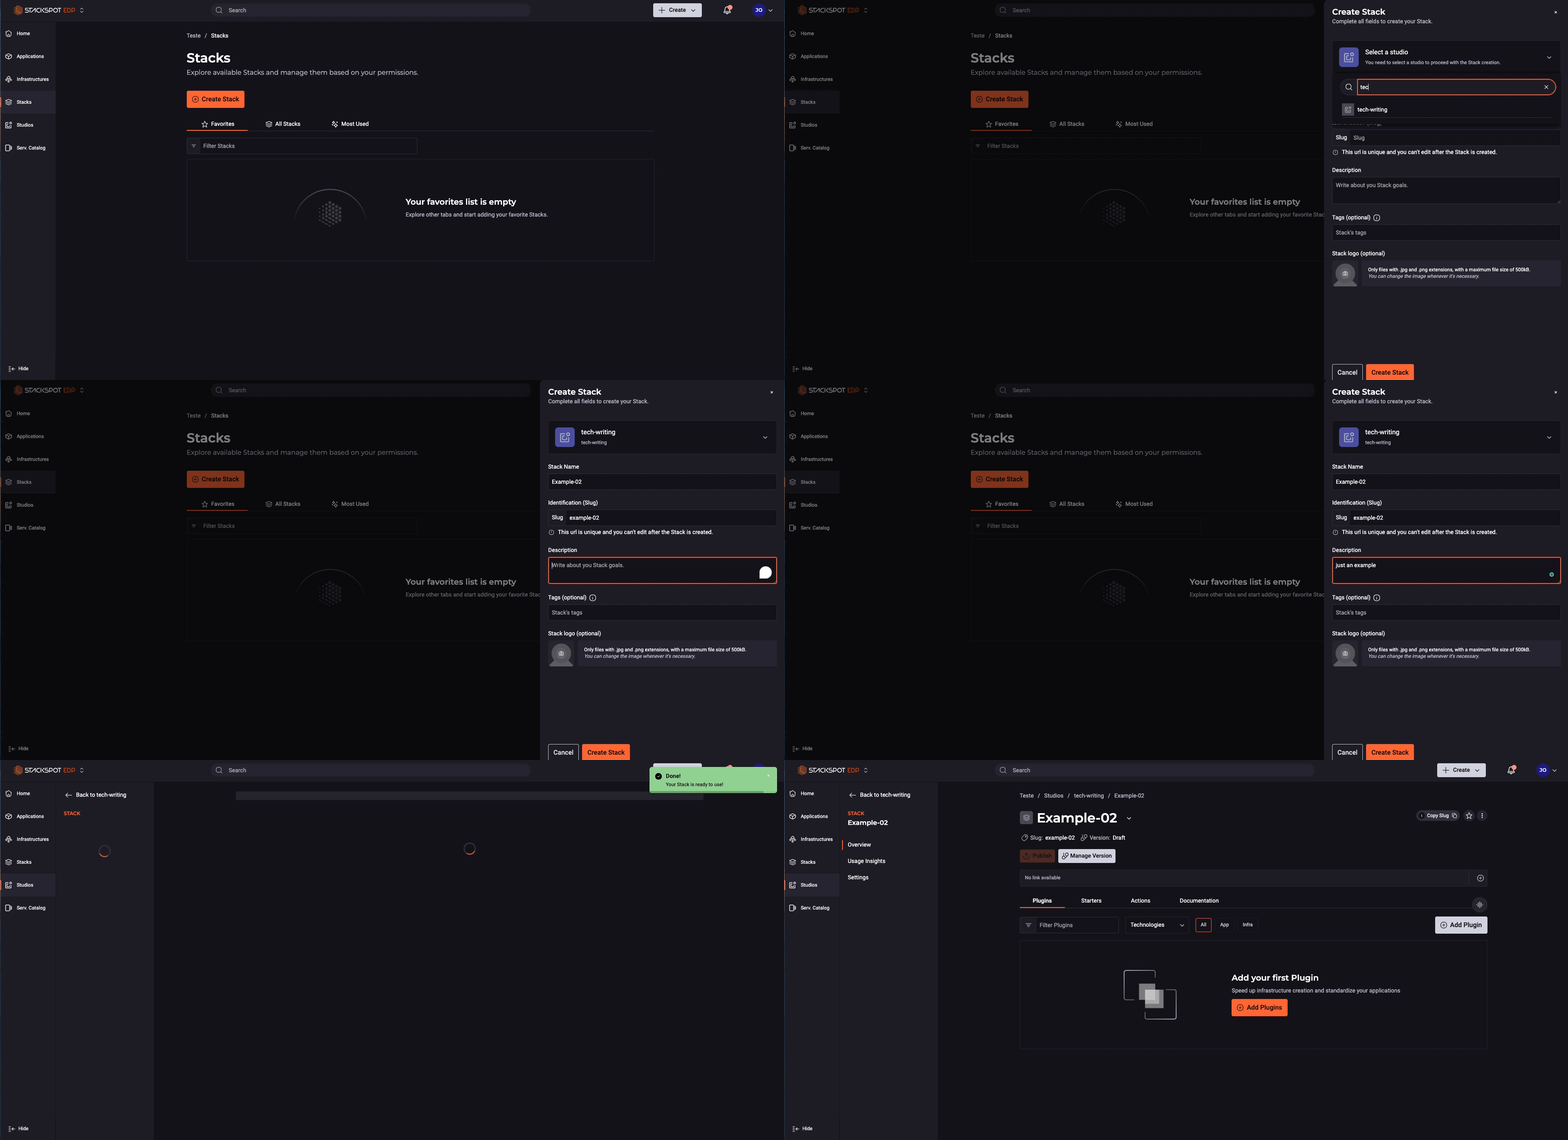
Create Stack
In this section, you will find a guide on how to create Stacks.
Prerequisites
To proceed, ensure you have done the following:
- Log in to the StackSpot Platform.
- Access a Studio.
- The Stack name must not exceed 60 characters.
To create a Stack, follow these steps in your Studio Dashboard on the StackSpot platform:
Step 1. Click on the 'Create Stack' button;
Select the Studio and fill in the following fields:
- Stack name: Add a name for your Stack.
- Identification (Slug): Add a slug for the Stack. Once the Stack is published, this field cannot be changed.
- Description: Describe your Stack's goal.
- Tags: Add classification tags (e.g., Web, Infra, Back-end, etc.).
- Logo (optional)
Except for Slug, these fields are editable only while the Stack is in Draft.
Step 2. Review the information and click the 'Create Stack' button;

To document a Stack or Starter created by the StackSpot Platform, you need to generate folders locally. To do this, follow the steps on the Documentation page.
Your Stack is now created, but unpublished. Add one Plugin or a Starter to the Stack. Check the two possibilities below:
1. Adding Plugins to your Stack
To view available Plugins, click the 'Plugins' tab in your Studio.
If you don't have Plugins published to your Account, in another Stack (with public visibility) or in your Studio, follow the steps to Create and Publish a Plugin.
Step 1. In the 'Plugins' tab, click the 'Add Plugin' button;
You can select Plugins from different sources:
- Studio: Plugins available in your Studio.
- Account: Plugins available in your Account.
- Insert a Qualifier: uniquely identifies the Plugin.
- Choose a specific version of the Plugin.
- If the Plugin depends on other Plugins, you must add them to the Stack. To do this, click the 'Add Required Content' button and select the Plugins from the side tab on the screen.
- If the Plugin depends on another Plugin from a different Studio, you will need permission to access it.
Step 2. Choose the version range of the Plugin or a specific version you want to add to your Stack.
Click the 'Add Plugins' button.
The Plugin was added to the Stack! You can find it in your Stack dashboard.
2. Creating a Starter in a Stack (Optional)
To add a Starter to your Stack, follow the steps below:
Step 1. On your Stack dashboard, click on the 'Starters' tab;
Step 2. Click on the 'Create starter' button;
Step 3. Select the type of Starter: App Starter or Infra Starter and then, click on the 'Next' button;
Step 4. On 'Basic information' provide the following information:
- Slug (Starter name): Add a name for your Starter.
- Description: Describe your Starter.
Click 'Continue';
Step 5. On 'Plugins', include Plugins for the Starter.
Select Plugins from the Studio, Account or Insert Qualifier.
If a Plugin that will be added to the Starter has other Plugins required, you will need to add them to the Stack and Starter before continuing.
After selecting the Plugins, click 'Add Plugins';
Check the order of Plugins in the Starter, as it determines the sequence in which they are applied when creating an Application or Infrastructure.
- You can only change this order while the Stack is in
Draftmode. - Add the least dependent Plugins first, followed by the more dependent ones for Plugins with dependencies.
Step 6. Review the Plugins order in the Starter. Click 'Continue';
Step 7. 'Review' the Starter information and click 'Save'.
You've added a Starter to your Stack!
Adding Actions to your Stack
To add Actions to your Stack, ensure you have an Action created and published.
Follow these steps to add one or more Actions to your Stack:
Step 1. In your Stack, go to the 'Actions' tab. Then, click on the 'Add action' button;
Step 2. Choose Actions from the following options:
- 'Available on Studio'
- Account Actions'
- 'Insert Qualifier';
Step 3. After selecting the Actions, click 'Add Action';
If a Plugin in your Stack requires a specific Action, you must add that Action to the Stack before proceeding.
You successfully added Actions to your Stack.
To use your Stack, make sure to add it to a Workspace.
Next steps
- Click the 'Publish' button to make your Stack available in your Studio. Follow the steps on the Publish your Stack guide.
For additions, changes, or deletions, publish a new version of your Stack.