Test Plugins
In this section, you will find a guide on how to create and execute test cases for your Plugins.
Overview
What are Plugin tests
Plugin tests enable you to create unit tests for your Plugins. These tests ensure that the Plugins behave as expected, including generating files and providing correct data inputs.
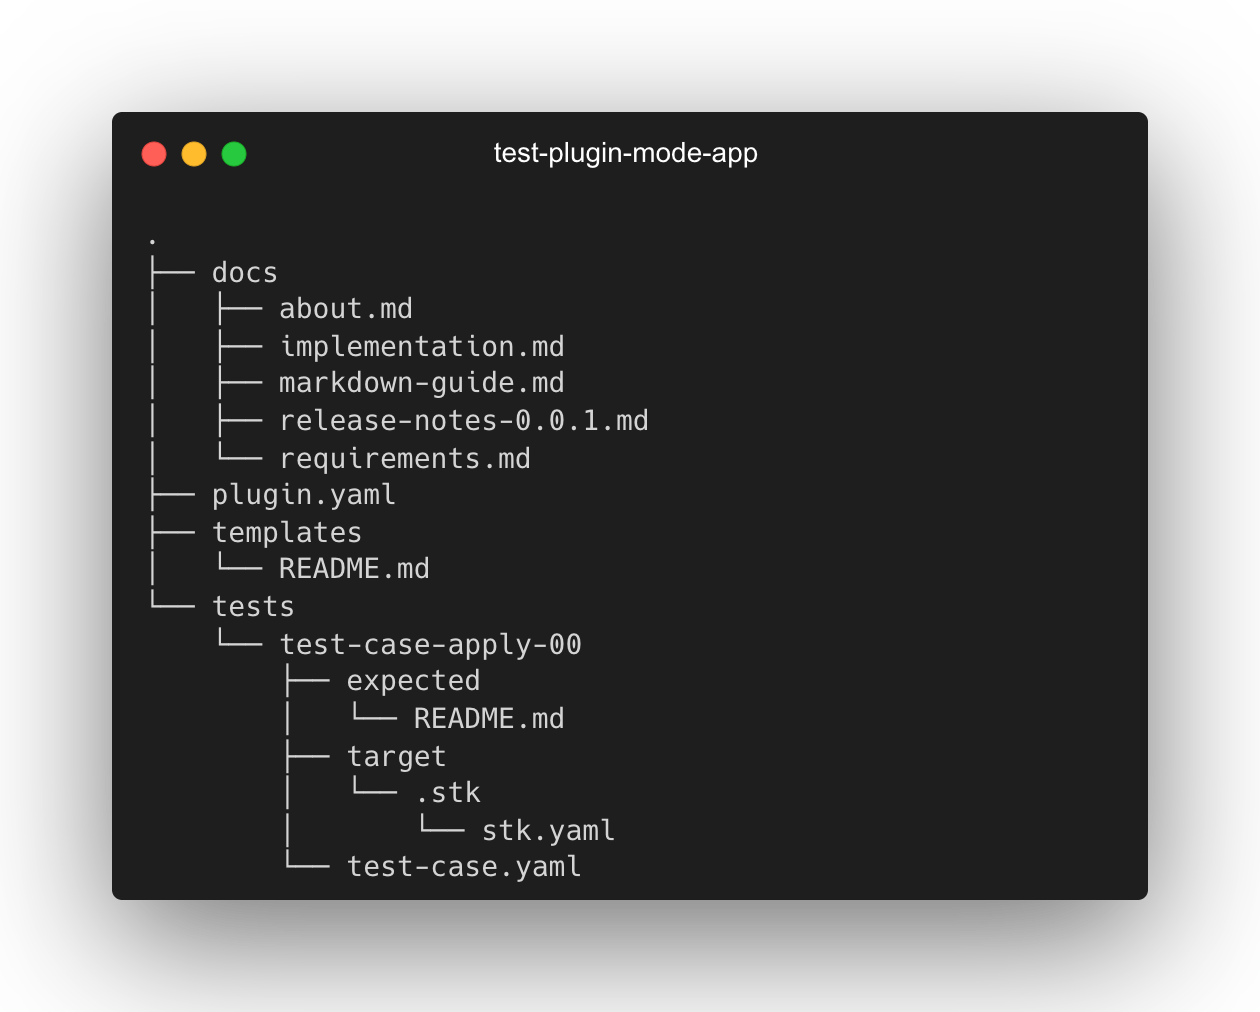
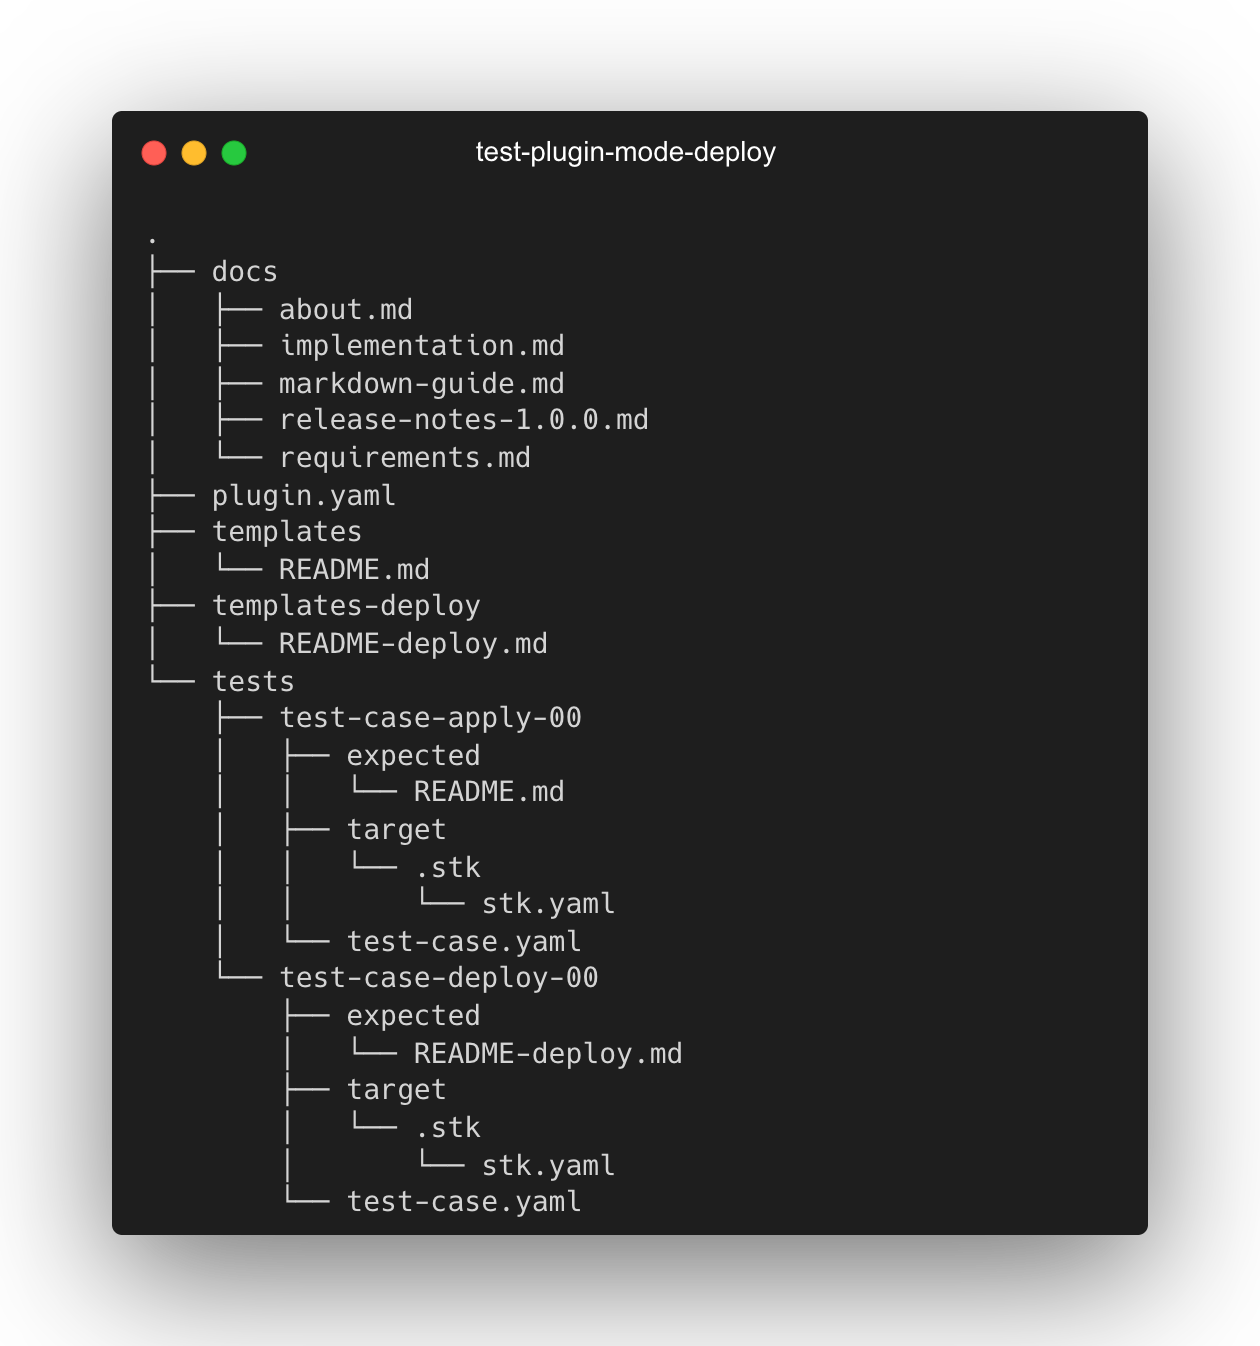
When you create a Plugin with the stk create plugin command, inside the generated files, you will find a test folder structure where the unit tests occur.
This structure starts with a directory called /tests (a folder called /tests) and other files, as you can see below for both App Plugins and Infra Plugins:
See the following structure:
- Application Plugin
- Infrastructure Plugin


Folders used in the tests
You will find details about each folder and its purposes below:
tests/ folder
Inside the Plugin, the tests/ folder contains the Plugin's test cases. Within each test case, two folders are mandatory:
- The
expectedfolder; and - The
targetfolder
See below:
expected/
The expected/ folder must contain all the files expected after applying the Application or Infrastructure Plugin, excluding the stk.yaml file (generated during the creation of an Application or Infrastructure).
target/
The target/ folder must contain the Application or Infrastructure. It must have the .stk folder and within it the stk.yaml file.
Test case files
Each test case has a manifest in .yaml format called test-case.yaml which provides information for testing your Plugin.
See below:
- Application test case
- Infrastructure test case
schema-version: v2
kind: test
spec:
  type: plugin
  mode: apply
  inputs: {}
schema-version: v2
kind: test
spec:
  type: plugin
  mode: deploy
  environment: production
  inputs: {}
Fields in the test-case.yaml file
spec:
- mode: Defines the type of the test case. The accepted values are
applyordeploy. The apply mode is for Plugin test cases applied to Applications. The deploy mode is for test cases of Infrastructure Plugins that generate or are applied to an Infrastructure.
Infrastructure Plugins can also apply changes to an Application and generate the infrastructure pieces. So, when you create Infrastructure Plugins, two test structures are generated:
- One in '
applymode; - And one in '
deploymode.
Because Infrastructure Plugins can also apply changes to an Application and generate the infrastructure parts.
- environment: Only for tests in deploy mode. It defines the environment used in the test. The accepted values are
productionanddevelopment.
The environment defined in environment does not correspond to any production or development environment. These are isolated environments used exclusively for Plugin testing.
- inputs List of the names of your Plugin's inputs (value
name:);
environment todevelopmentto validate the input-envs;
Creating test cases
If you've created a new Plugin, the test structure is generated automatically. For existing Plugins without test cases, manually create the structure and fill in the test case files.
Before you begin
When you create a Plugin, the basic structure of a test case is generated automatically. For existing Plugins that do not have test cases, you must manually create this structure and fill in the test case files. See below:
Inside your Plugin folder:
- Create the
testsfolder; - Inside the tests folder, create the folder with the name of your test case, for example, "test-case-001";
- Inside your test case:
- Create the file
test-case.yamland paste the contents below into your test file:
- For Application Plugins
- For Infrastructure Plugins
schema-version: v2
kind: test
spec:
  type: plugin
  mode: apply
  inputs: {}
schema-version: v2
kind: test
spec:
  type: plugin
  mode: deploy
  environment: production
  inputs: {}
- Create the expected and target folders.
Fill in the Plugin test
With the testing structure in your Plugin ready, add the files and fill in your Plugin's inputs:
1. Add the Plugin files to the test case
- In the '/target' folder, add a copy of the
.stkfolder containing thestk.yamlfile of your Application or Infrastructure; - In the '/expected' folder: Add to this folder a copy of all the files that your Plugin generates to generate an Application, Infrastructure, or add new features to an existing Application or Infrastructure, except for the
.stk/stk.yamlfile.
For Application Plugins, copy all the files from the /templates folder of your Plugin to the /expected folder of the test. For Infrastructure Plugins, copy all the files from the /templates-deploy folder of your Plugin to the /expected folder of the test.
2. Fill in the test-case.yaml file
In the test-case.yaml file of your test, check and fill in the test inputs based on the Plugin type.
In the spec: field, check that the following options are filled in:
- The
mode:option must have the valueapplyfor Application Plugin tests or the valuedeployfor Infrastructure Plugins; - For Infrastructure Plugins only, the
test-case.yamlmust have in the "spec:" field the option "environment:" with the valuesproductionordevelopmentfilled in.
Fill in the inputs
Consider a Plugin with the following inputs:
- The example below highlights the
name:fields of the inputs that you should add to the test case;
spec:
  # .
  # .
  # . Other spec fields above...
  inputs:
    - label: Database name
      name: database_name
      type: text
      required: true
Fill in the inputs
Consider a Plugin with the following inputs:
- The example below highlights the
name:fields of the inputs that you should add to the test case;
spec:
  # .
  # .
  # . Other spec fields above...
  inputs:
    - label: Database name
      name: database_name
      type: text
      required: true
      name: database_type
      type: select
      required: true
      items:
        - Relational
        - Relational PROD
        - Non-Relational
    - label: Database
      name: database
      type: select
      required: true
      items:
        - MySQL
        - PostgreSQL
        - SQL Server
        - MongoDB
The completed test file should look like one of the examples below, where the syntax of the inputs should be:
- inputs
inputs:
  input_name: "input value"
- Plugin in 'apply' mode
- Plugin in 'deploy' mode and 'development' environment
- Plugin in 'deploy' mode and 'production' environment
schema-version: v2
kind: test
spec:
  type: plugin
  mode: apply
  inputs:
    database_name: "customer-api-db"
schema-version: v2
kind: test
spec:
  type: plugin
  mode: deploy
  environment: development
  inputs:
    database_name: "customer-api-dev-db"
schema-version: v2
kind: test
spec:
  type: plugin
  mode: deploy
  environment: production
  inputs:
    database_name: "customer-api-prod-db"
Fill in requires and generates Connections
If your Plugin generates or requires Connections, you must add them to the test case. Consider the examples below:
- Plugin that requires a Connection
- Plugin that generates a Connection
schema-version: v4
kind: plugin
metadata:
  name: plugin-infra-req-s3
  display-name: plugin-infra-req-s3
  description: Plugin that requires S3
  version: 0.0.1
  picture: plugin.png
spec:
  type: infra
  compatibility:
    - python
  docs: #optional
    pt-br: docs/pt-br/docs.md
    en-us: docs/en-us/docs.md
  single-use: False
  runtime:
    environment:
      - terraform-1-4
      - aws-cli-2
      - git-2
  repository: https://github.com
  technologies: # Ref: https://docs.stackspot.com/create-use/create-content/yaml-files/plugin-yaml/#technologies-1
    - Api
  inputs:
    - label: Connection interface for your aws-s3-req-alias
      name: aws-s3-req-alias
      type: required-connection
      connection-interface-type: aws-s3-conn
  stk-projects-only: false
schema-version: v4
kind: plugin
metadata:
  name: plugin-infra-gen-s3
  display-name: plugin-infra-gen-s3
  description: Plugin to generate S3
  version: 0.0.1
  picture: plugin.png
spec:
  type: infra
  compatibility:
    - python
  docs: #optional
    pt-br: docs/pt-br/docs.md
    en-us: docs/en-us/docs.md
  single-use: False
  runtime:
    environment:
      - terraform-1-4
      - aws-cli-2
      - git-2
  technologies: # Ref: https://docs.stackspot.com/create-use/create-content/yaml-files/plugin-yaml/#technologies-1
    - Api
  stk-projects-only: false
  inputs:
    aws-s3-gen-alias:
      selected: my-selected-s3
      outputs:
        arn: "my-s3-aws-arn"
        bucket_name: "my-s3-aws-bucket-name"
The syntax of the test file filled out with the previous example should be:
- Requires Connection on 'apply' mode
- Requires Connection on 'deploy' mode
- Generates Connection on 'apply' mode
- Generates Connection on 'deploy' mode
inputs:
  input_name:
    selected: input-an-alias-name
    outputs:
      output_name1: "output_name"
      output_nameN: "output_name"
Example:
schema-version: v2
kind: test
spec:
  type: plugin
  mode: apply
  inputs:
    aws-s3-req-alias:
      selected: my-selected-s3
      outputs:
        arn: "my-s3-aws-arn"
        bucket_name: "my-s3-aws-bucket-name"
inputs:
  input_name:
    selected: input-an-alias-name
    outputs:
      output_name1: "output_name"
      output_nameN: "output_name"
Example:
schema-version: v2
kind: test
spec:
  type: plugin
  mode: deploy
  inputs:
    aws-s3-req-alias:
      selected: my-selected-s3
      outputs:
        arn: "my-s3-aws-arn"
        bucket_name: "my-s3-aws-bucket-name"
inputs:
  input_name:
    selected: input-an-alias-name
    outputs:
      output_name1: "output_name"
      output_nameN: "output_name"
Example:
schema-version: v2
kind: test
spec:
  type: plugin
  mode: apply
  inputs: {}
  generates:
    connections:
      - type: aws-s3-conn
        selected: my-new-s3
        alias: aws-s3-gen-alias
inputs:
  input_name:
    selected: input-an-alias-name
    outputs:
      output_name1: "output_name"
      output_nameN: "output_name"
Example:
schema-version: v2
kind: test
spec:
  type: plugin
  mode: deploy
  inputs:
    my_new_s3:
      selected: aws-s3-gen-alias
      outputs:
        s3_name: my-new-s3
        s3_arn: my-arn
Fill outputs with lists and objects
Below is an example of how you can fill a test case with Connections outputs with objects, object lists, and string lists:
schema-version: v2
kind: test
spec:
  type: plugin
  mode: deploy
  inputs:
    nlb_name: "my-nlb"
    nlb_type: "application"
    region: sa-east-1
    owner_team_email: "myemail@org.com"
    tech_team_email: "myteam@org.com"
    aws-vpc-req-alias:
      selected: my-vpc
      outputs:
        azs: # string list
          - my-azs-1
          - my-azs-2
        default_vpc: # vpc object
          id: "my-default-vpc-id"
          arn: "my-default-vpc-arn"
          cidr_block: "my-default-vpc-cidr"
        private_subnets: # list of subnets objects
          - id: "my-private-subnets-id"
            arn: "my-private-subnets-arn"
            cidr_block: "my-private-subnets-cidr"
            name: "my-private-subnets-name"
          - id: "my-second-private-subnets-id"
            arn: "my-second-private-subnets-arn"
            cidr_block: "my-second-private-subnets-cidr"
            name: "my-second-private-subnets-name"
        public_subnets: # list of subnet object
          - id: "my-public-subnets-id"
            arn: "my-public-subnets-arn"
            cidr_block: "my-public-subnets-cidr"
            name: "my-public-subnets-name"
        vpc: # vpc object
          id: "my-vpc-id"
          arn: "my-vpc-arn"
          cidr_block: "my-vpc-cidr"
  generates: {}
Run tests
You run the tests inside your Plugin's folder. To run the tests, access your Plugin folder and execute the commands below according to the tests you want to run:
Run all Plugin tests
Run the command:
stk test plugin
Run a specific Plugin test
Run the test command with the name of the test folder:
stk test plugin [test-case-name]
Running tests with the '--mode' filter
You can run the tests with the --mode option to filter the tests according to the mode in which it has been configured. You define the filter by entering the value apply or deploy:
stk test plugin --mode deploy/apply
Error scenarios and ignored tests
During the execution of the test cases, it is essential that you quickly identify the errors found in your Plugins. Check out the mapped errors and scenarios where your Plugin needs to be adjusted below.
Click on the items below to open the content:
Mapped Errors
- Code:
STK_MESSAGE_BUSINESS_EXCEPTION_FOLDER_HAS_NO_TESTS_FOLDER_ERROR - Code:
STK_MESSAGE_BUSINESS_EXCEPTION_TEST_PLUGIN_NO_TESTS_FOUND_WITH_APPLY_MODE_ERROR - Code:
STK_MESSAGE_BUSINESS_EXCEPTION_TEST_PLUGIN_NO_TESTS_FOUND_WITH_DEPLOY_MODE_ERROR - Code:
STK_MESSAGE_BUSINESS_EXCEPTION_TEST_PLUGIN_NO_TESTS_FOUND_WITH_TEST_NAME_ERROR - Code:
STK_MESSAGE_BUSINESS_EXCEPTION_TEST_PLUGIN_NO_TESTS_FOUND_ERROR - Code:
STK_MESSAGE_BUSINESS_EXCEPTION_MISSING_REQUIRED_INPUTS_ERROR - Code:
STK_MESSAGE_BUSINESS_EXCEPTION_TEST_PLUGIN_INVALID_PLUGIN_MANIFEST_ERROR - Code:
STK_MESSAGE_BUSINESS_EXCEPTION_OPTION_DEPLOY_MODE_ONLY_TO_INFRA_PLUGIN_TYPE_ERROR
Scenario: When you did not find the tests folder;
Scenario: When no tests with apply mode are found in the test-case.yaml manifest;
Scenario: When no tests are found with deploy mode in the test-case.yaml manifest;
Scenario: When no test cases with the desired name were found;
Scenario: When no tests were found in the tests folder;
Scenario: When required input(s) are not in the test case manifest (test-case.yaml);
Scenario: When the Plugin manifest (Plugin.yaml) could not be converted because it is invalid
Scenario: When using option --mode deploy for Plugin with different type of infra.
Ignored Tests
- When there is no target folder in the test case directory.;
- When the target folder does not contain the App/Infra manifest (.stk/stk.yaml);
- When the target folder contains an invalid app/infra manifest (.stk/stk.yaml);
- When there is no expected folder in the test case directory;
- When the expected folder is empty;
- When the test case manifest (test-case.yaml) is invalid;
- When it was not possible to convert the test case manifest (test-case.yaml);
- When test scenario contains --mode: deploy for Plugin of type app.
Test failure during Plugin application
- When required input(s) are not included in the test case manifest (test-case.yaml);
- When input(s) do not follow the input regex pattern;
- When an unexpected error occurs during application of the Plugin;
Test failure in the validation of the generated files
- When the applied Plugin generated an unexpected file;
- When the applied Plugin generated an unexpected folder;
- When the applied Plugin did not generate an expected folder;
- When the applied Plugin did not generate an expected file;
- When an unexpected failure occurs during the validation of the generated files.
Test failure when validating the content of the generated files
- When the applied Plugin generated a line with different content than expected;
- When the applied Plugin generated fewer lines than expected;
- When the applied Plugin generated more lines than expected.