Create Action
In this section, you will find a guide on how to create Actions on STK CLI.
At StackSpot, Actions are tools that let you automate tasks on your computer using scripts. You can use inputs and files with your scripts to automate processes or make routine tasks in your organization easier.
After creating your Actions, you can publish and share them in your organization. This helps everyone use the same automated process.
Actions run only through the STK CLI. They can do things like:
- Connect with other systems using StackSpot integration.
- Perform developer tasks, such as creating a GitHub repository.
Requirements
- STK CLI installed.
- Permission to create and publish in the Studio.
- The Action file must be a maximum of 14MB.
- The Action name limit is 60 characters.
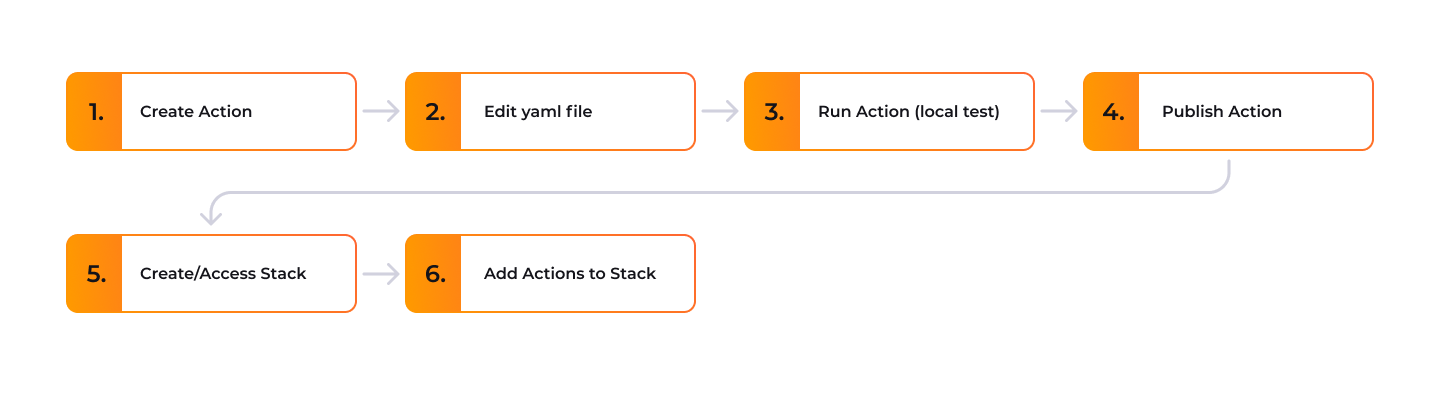
Step 1. Create an Action
You can create Actions via the StackSpot CLI (STK CLI). By default, every Action has a local scope, and you can only execute them via STK CLI. You can also configure the Action in your Account and execute it remotely.
See the steps
To create the initial structure of your Action, execute the stk create action command and answer the questions below on the terminal:
stk create action
- Name your Action: Enter a name for your Action;
- Add repository: Enter Yes (Y) or No (N). If you already have a repository, add the URL of the remote repository. If not, the Action is created in the current directory;
- Action Description: Add a description for the Action;
- Version: Enter a version for your Action, the version must follow the semantic versioning format (e.g. 1.0.0 or 3.1.0);
- Select the Action type: Choose between Python or Shell;
- Connection required: Enter Yes (Y) or No (N). To add a Connection, check the List of Connections;
Check the generated files
Navigate to the Action folder you created and inspect the generated files:
- Python Actions
- Shell Actions
/docs #required
/templates # optional
action.yaml #required
script.py # required
/docs #required
/templates # optional
action.yaml #required
- In the
/templatesfolder, add any files or scripts that can be executed or complement the type of your Action. Remember to create the/templatesfolder.
-
In the
/docsfolder are the Markdown files for you to fill in the documentation for your Action; -
The file
action.yamlis what constitutes your Action. It contains all the Action information and settings you need to add. -
The
script.pyfile is generated for Python Actions. It's an example script for you to edit or replace with your scripts.
After creating your Plugin, you'll have one of the examples below:
- Python Actions
- Shell Actions
schema-version: v3
kind: action
metadata:
  name: my-python-action
  display-name: my-python-action
  description: Describe your action explaining its purpose
  version: 1.0.0
spec:
  type: python
  docs:
    pt-br: docs/pt-br/docs.md
    en-us: docs/en-us/docs.md
  inputs:
    - label: Who are you?
      name: user_name
      type: text
      required: false
      pattern: '([A-Z][a-z]+)+'
      help: 'Inform your name'
  python:
    workdir: .
    script: script.py
- python.workdir: Folder where the Action should be executed.
- python.script: Path to the Python script that will be executed.
schema-version: v3
kind: action
metadata:
  name: my-shell-action
  display-name: my-shell-action
  description: Describe your action explaining its purpose
  version: 1.0.0
spec:
  type: shell
  docs:
    pt-br: docs/pt-br/docs.md
    en-us: docs/en-us/docs.md
  inputs:
    - label: Type some label
      name: random-name
      type: text
      required: false
      pattern: '([A-Z][a-z]+)+'
      help: 'Inform your resource name (e.g.: Client)'
  shell:
    workdir: .
    requirements-check:
      - check-command:
          linux: |
            echo "Hello World!"
          mac: |
            echo "Hello World!"
          windows: |
            echo "Hello World!"
        info: "Failed saying hello to world."
    script:
      linux: |
        echo "Hello World!"
      mac: |
        echo "Hello World!"
      windows: |
        echo "Hello World!"
- shell.workdir: Folder where the Action should be executed.
- shell.requirements-check: Dependency check to map if all the requirements to execute the Action are present.
- check-command: Attribute present in each check. Defines and executes the command that checks the dependency.
- info: Error message displayed if the command executed fails the dependency check.
- shell.script: Defines the commands executed in the operating system shell. Different commands can be defined for each supported operating system. The supported systems are Linux, macOS, and Windows.
Step 2. Edit your Action
After you create an Action, it may look different from the examples above, depending on your choices during setup. The generated action.yaml file contains only the basic structure and a few example fields. You need to edit the spec: section to customize and start using your Action. Below are the main changes you can make:
Using Inputs
You can add inputs to your Action to interact with the developer through the terminal. Inputs let you ask for information, guide choices, or collect values based on conditions. Inputs are optional.
See the documentation for all input types and usage.
Advanced Inputs
Advanced inputs can do more than interact with the developer—they can also work with inputs from other Plugins. You can use values from one Plugin in another, or access data from other Plugins in your Action.
See the advanced inputs documentation for more details.
Action Metadata
Metadata is an object created while running a Plugin or Action. It contains information that can help you run other processes or automation steps.
See the Metadata documentation for examples.
Using Jinja
Jinja is a template language that lets you create dynamic content in your Plugins and Actions with StackSpot. You can use Jinja expressions to insert values and generate results automatically. You can use Jinja in many parts of your Action, especially in files inside the /templates folder.
See the Jinja usage documentation for more details.
Use examples in python with Actions
from templateframework.metadata import Metadata

def run(metadata: Metadata = None):
  print('# list your project name', metadata.inputs['var']['STK_PROJECT_NAME'])
  print('# list your Stack name', metadata.inputs['var']['STK_STACK'])
  print('# list your Studio name', metadata.inputs['var']['STK_STUDIO'])
  print('# list your Workspace name', metadata.inputs['var']['STK_WORKSPACE'])
Using Connections Interfaces
You must use the connections input if you want to add an Action to an Infra Plugin. The Action must require at least one Connection Interface generated by the Infra Plugin in order to be added to it.
See the Add Action to an Infra Plugin guide for more information.
StackSpot uses Connection Interfaces to provide all the information a cloud resource needs to connect. Connection Interfaces are organized by cloud resource type, and each type generates a Connection.
When an Action runs, it may require a connection to function properly. The example below shows how to declare a connection dependency in the Action configuration:
action.yaml file example of a type Python Action
schema-version: v3
kind: action
metadata:
  name: some-kebab-case-name
  description: some description
  display-name: Some display name
  version: 1.0.1
  picture: images/plugin.png
spec:
  type: python
  docs:
    pt-br: docs/pt-br/docs.md
    en-us: docs/en-us/docs.md
  inputs:
    - label: Connection label for connection name
      name: Name of your connection
      type: required-connection
      connection-interface-type: connection_type
  python:
    workdir: another/random/path
    script: random_name/a_cool_name.py
Example of the script.py file
def run(metadata):
    print(f"Arn: {metadata.inputs.get('some-type__alias__arn')}")
    print(f"Name: {metadata.inputs.get('some-type__alias2__name')}"
Use template in the Action (Optional)
Before executing an Action, you can use predefined values and scripts for its execution. To do this, you must create the templates folder within your Action and place the desired files to compose the Action.
See the following example of an Action of type shell using the contents of the templates folder:
Action's content
➜  my-shell-action
.
├── action.yaml
├── docs
│   ├── pt-br: docs/pt-br/docs.md
│   ├── en-us: docs/en-us/docs.md
└── templates
    └── name-value.txt
You must create the templates folder inside the Action. Add any files or scripts that can be executed or complement the type of your Action.
Templates content and Action metadata
- File from the templates folder
- Actions metadata
Text file name-value.txt contains the values that will be used by the Action before it is executed.
Hello {{full_name}} !
schema-version: v3
kind: action
metadata:
  name: my-shell-action
  display-name: my-shell-action
  description: Shell Action type with template files.
  version: 1.0.0
spec:
  type: shell
  docs:
   pt-br: docs/pt-br/docs.md
   en-us: docs/en-us/docs.md
  inputs:
    - type: text
      name: name
      label: Name
    - type: text
      name: last_name
      label: Last Name
  computed-inputs:
    full_name: "{{name}} {{last_name}}"
  shell:
    script:
      linux: cat {{component_path}}/name-value.txt
The file action.yaml contains the inputs that will collect the values that will be interpolated in the file name-value.txt to be used in the Action.
In action.yaml, you must use the folder component_path to be able to render the interpolated content of your files or scripts from the templates folder alongside the contents of the Action.
The syntax used for component_path is:
{{component_path}}/[file_path]
- Number of files in the templates folder: Use as many files as you like.
- Component_path examples: See examples and learn more at Metadata.
- Advanced Inputs: Learn more about computed-inputs and others in advanced-inputs.
- Interpolate values: Learn more about interpolating values with Jinja in StackSpot.
Step 3. Run an Action (local test)
When you run an Action, all the tasks defined within it will be executed locally on your machine. However, there are a few important points to consider before running Actions locally:
Running an unpublished Action
You can run unpublished Actions locally to test their functionality before publishing. To do this, use the following command and provide the path to the Action's folder:
Run the stk run action command.
Example:
stk run action /Users/user.name/my-action-name
When you run Actions to a pipeline workflow, the Action do not use the interactive mode (input queries via the terminal). To inform the input values, you need to inform the input and the value as a parameter. For more information, check out how to inform input values as parameters.
Step 4. Validate the Action
Step 1. Run the stk validate action command in the Action folder.
stk validate action
Step 2. If the validation runs successfully, follow the instructions below to publish your Action.
If any errors are returned, you must correct them and rerun the validation.