Create Connection Interface
In this section, you will find how to create Connection Interfaces.
What is a Connection Interface
A Connection Interface is a contract that defines the parameters, inputs, variables, or attributes needed to ensure that a set of Cloud resources can connect and work together seamlessly. It establishes the rules for how different components within StackSpot interact.
To create a Connection Interface, you use an Infrastructure Plugin that implements a Connection Interface Type. This type specifies the structure and requirements for generating Cloud resources. Applications that comply with the Connection Interface contract can share and use the same resources as long as they adhere to the defined interface.
An instance of a Connection Interface is created only when a Plugin is applied or when an Infrastructure or Application is deployed.
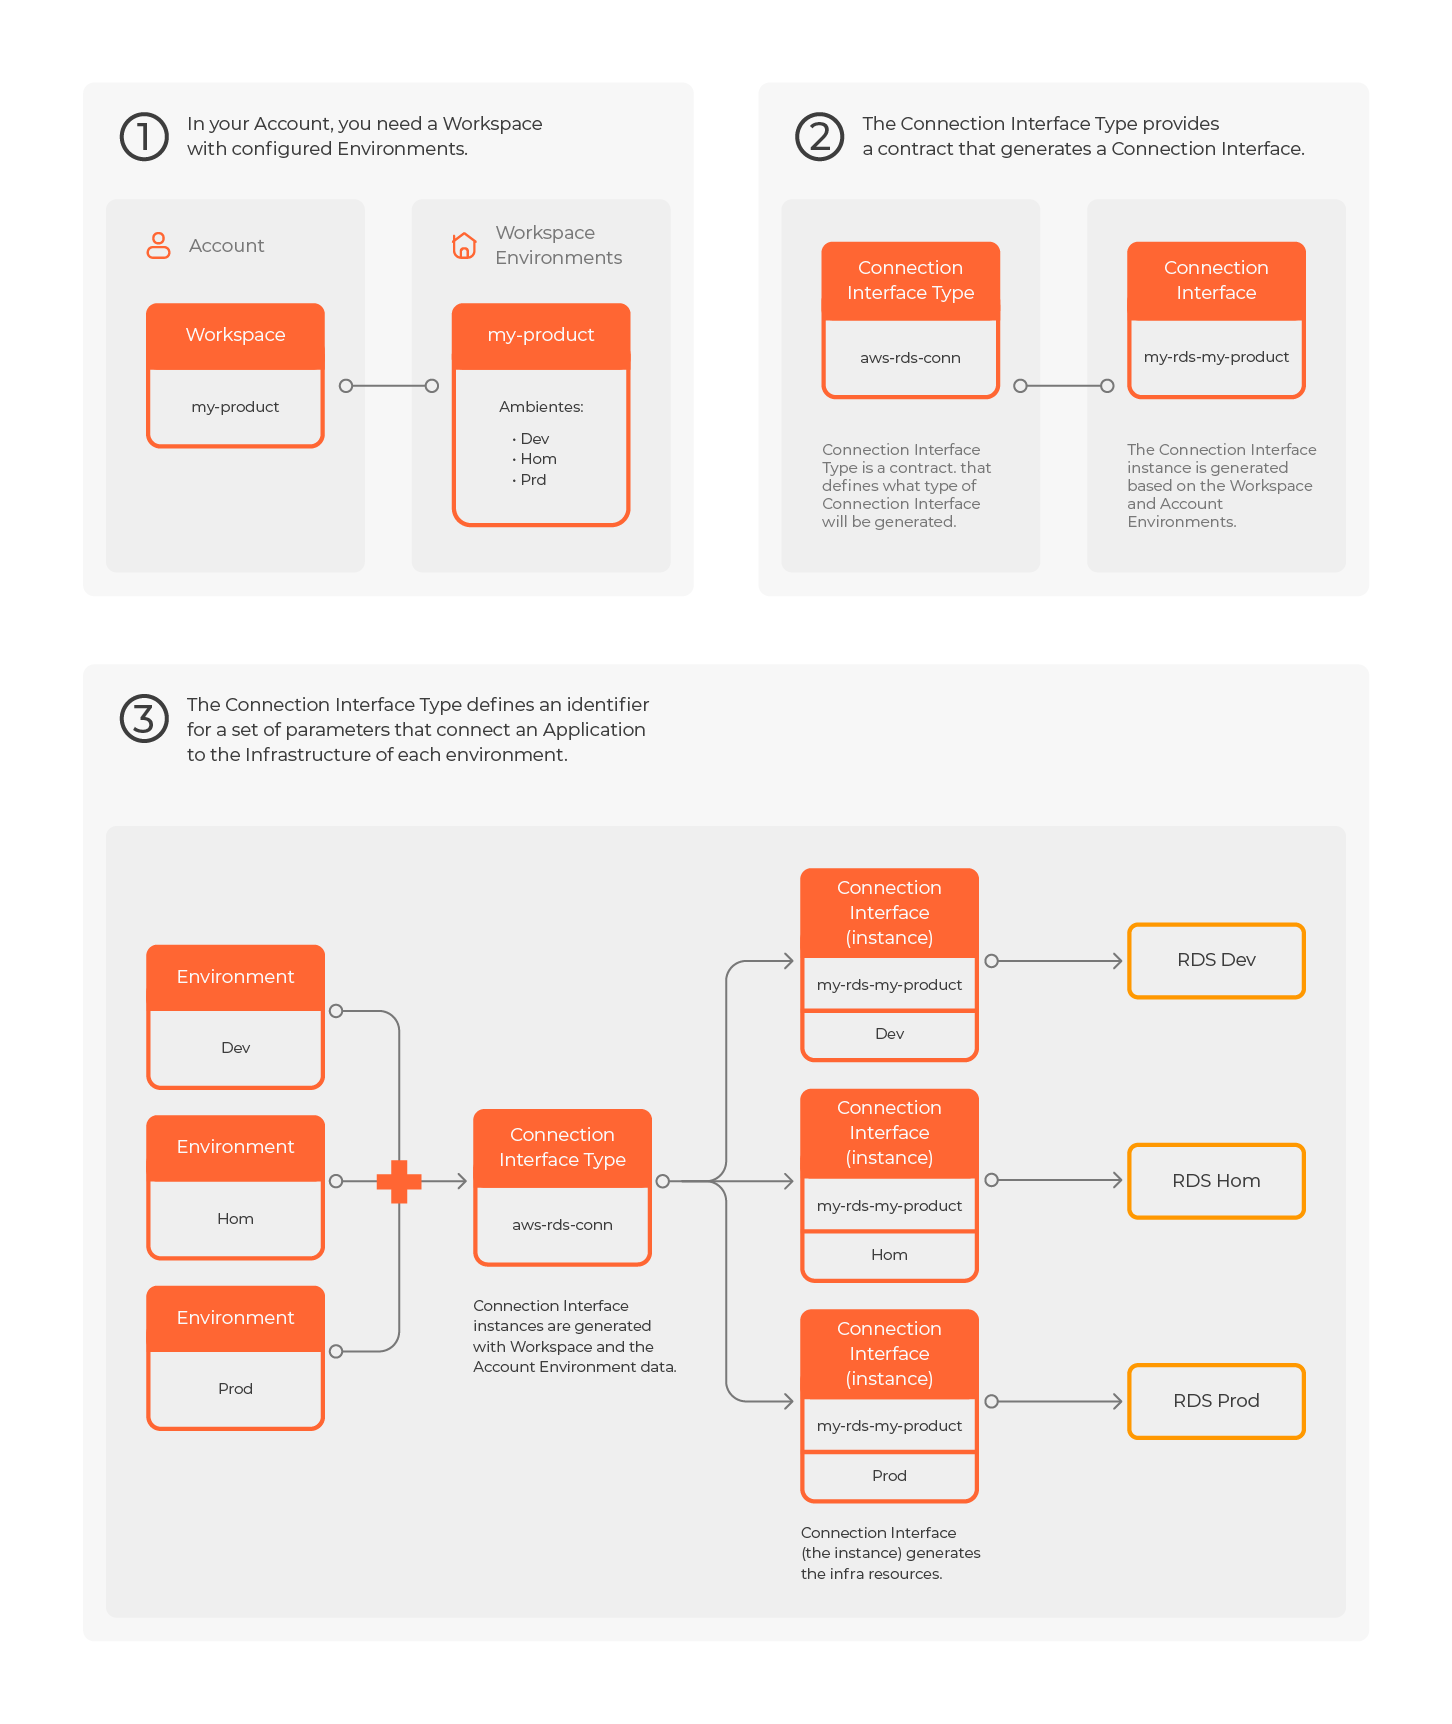

Example
There is an ECS Cluster Fargate provisioning on AWS. The way you use it and how this resource is provisioned and configured is the Connection Interface. The name is ECS Cluster Fargate Conn.
How to create a Connection Interface in a Workspace manually
You can manually create a Connection Interface in your Workspace. Follow the steps below:
Step 1. Log in to the StackSpot EDP Portal and click ’Workspaces’ in the main menu on the homepage;
Step 2. In the Workspace main menu, click on 'Connection Interfaces';
Step 3. Select the Created by user tab;

Step 4. Click on the 'Create Connection Interface' button;
Step 4. On the 'Information' screen, enter a name for your Connection Interface in the 'Name' field;
Then 'Select Connection Type', and click on the 'Next' button;

Step 5. In 'Parameters' screen:
- Enter the required values for your Connection Interface parameters.
- By default, these values will apply to all environments.
- To define values for specific environments, enable the "Define values by environment" option and customize the parameters for each environment.
For more details about the outputs for each Connection Interface type, refer to the Parameters section below.

In general, parameters are of type string.
However, some Connection Interface types require parameters of type Object or Array, which must be entered as JSON according to the JSON Schema provided in the text editor.
Step 6. On the 'Review' screen, review the information and then click on the 'Finish' button.
You created a Connection Interface!
You can configure it by following the steps in the next section.
Setting up a Connection Interface visibility in the Workspace
The default visibility of Connection Interfaces depends on how you want to create them. When generated, Connection Interfaces have their visibility set to Application or Workspace.
Check the visibility rules:
- Workspace: When an Infrastructure generates the Connection Interface, only members of the Workspace where the Infrastructure was created can use and view it.
- Application: Only the associated Application can use the Connection Interface when an Application generates the Connection Interface.
Steps to Configure Visibility
Step 1. On the Workspace main menu, click on 'Connection Interfaces';
Step 2. From the list of available Connection Interfaces, choose the one you want to configure;
Step 3. At the bottom of the screen, click on 'Visibility' and select the level of visibility you want to configure. After that, check if your change is visible in your Workspace.
Now, your Connection Interface is configured and ready to be used.
The data displayed for the Connection Interface on the screen is not treated as sensitive. Ensure you handle it accordingly.
Parameters
Terraform outputs will be displayed as Connection Interface Type outputs.
For more information, access the Connection Interface Types
Jinja References
You can reference Jinja in Connection Interfaces, see below how it was in the v1 Plugins:
V1:
requires:
  connection-interface:
    - connection-interface-one
The attributes are referenced with the Connection Interface on Terraform. Check the model below:
{{connection_interface_one_CONNECTOR}}
{{connection_interface_one_CONNECTOR_engine}}
{{connection_interface_one_CONNECTOR_is_stackspot_fun}}
This model still works on v1, but it is not recommended to use it in v2.
v2:
You can access Connection Interfaces attributes using a connection. You can include an alias in the syntax. There are two ways to access the attributes:
- Kebab case: Access using
{and a string, similar to a dictionary. Check the example:
{{connections["connection-interface-one"].engine}}
- Snake case: Access the attributes by converting the Kebab into a Snake case.
{{connections.connection_interface_one.is_stackspot_fun}}
An extra option is to access it via a Camel case. Check the example below:
{{connections["connectionInterfaceOne"].engine}}
Synchronize Connection Interfaces in the Workspace
This Action creates or updates Connection Interface instances per environment. If the instance already exists in the specified environment, the Connection Interface will only be updated with the new attribute values. If it does not exist, the instance will be created with the provided attributes and values.
Prerequisites
- Python installed.
- Valid service credentials (Client ID and Client Secret) with permissions to edit Workspaces and Environments in StackSpot.
Steps
The Action can be executed via the StackSpot CLI.
Step 1. Run the command below in the STK CLI:
stk run action stackspot-core/stackspot-synchronize-connection-interface
Step 2. During the execution of the Action, provide the following inputs:
| name | type | help |
|---|---|---|
workspace_name | text | Enter the name of the Workspace where the synchronization will take place. |
environment_name | text | Enter the name of the environment related to the Connection Interfaces. |
connections_json | textarea | JSON with the attributes of the Connection Interfaces. |
Check below for an example of the connections_json input:
{
  "aws-s3-conn": [
    {
      "stk_connection_name": "emb-dev-stackspot-files-raw",
      "outputs": {
        "arn": "arn:aws:s3:::emb-dev-stackspot-files-raw",
        "bucket_name": "emb-dev-stackspot-files-raw"
      }
    }
  ]
}