Configure Azure Cloud account
In this section, you will find a guide on configuring your Cloud Account.
To deploy the infrastructure of your Applications on StackSpot, set up a cloud account. Configure this within your Workspace, delegating access between Azure accounts using Azure credentials to grant StackSpot access to your account profile.
The configuration and addition of Cloud accounts in StackSpot in this manner are only available for:
- Enterprise Accounts created before 2024.
For Enterprise Accounts created from January 2024 onwards, the Cloud accounts must be connected via Self-hosted Deploy.
Prerequisites
- Access to an Azure account with a contracted subscription.
- Azure CLI installed in version 3.0.0 or higher.
- Access to a Workspace;
- You need an environment in your Workspace.
- Permission to manage IAM.
- Permission to manage Cloud accounts in your StackSpot account:
cloud_services:manage_cloud_account. See how to customize Roles and Permissions in your StackSpot Account. - Configure the Terraform file with the Microsoft Azure provider as follows:
terraform {
  required_providers {
    azurerm = {
      source  = "hashicorp/azurerm"
      version = "=3.0.0"
    }
  }
}

# Your code goes here
Step 1. Generate provider credentials
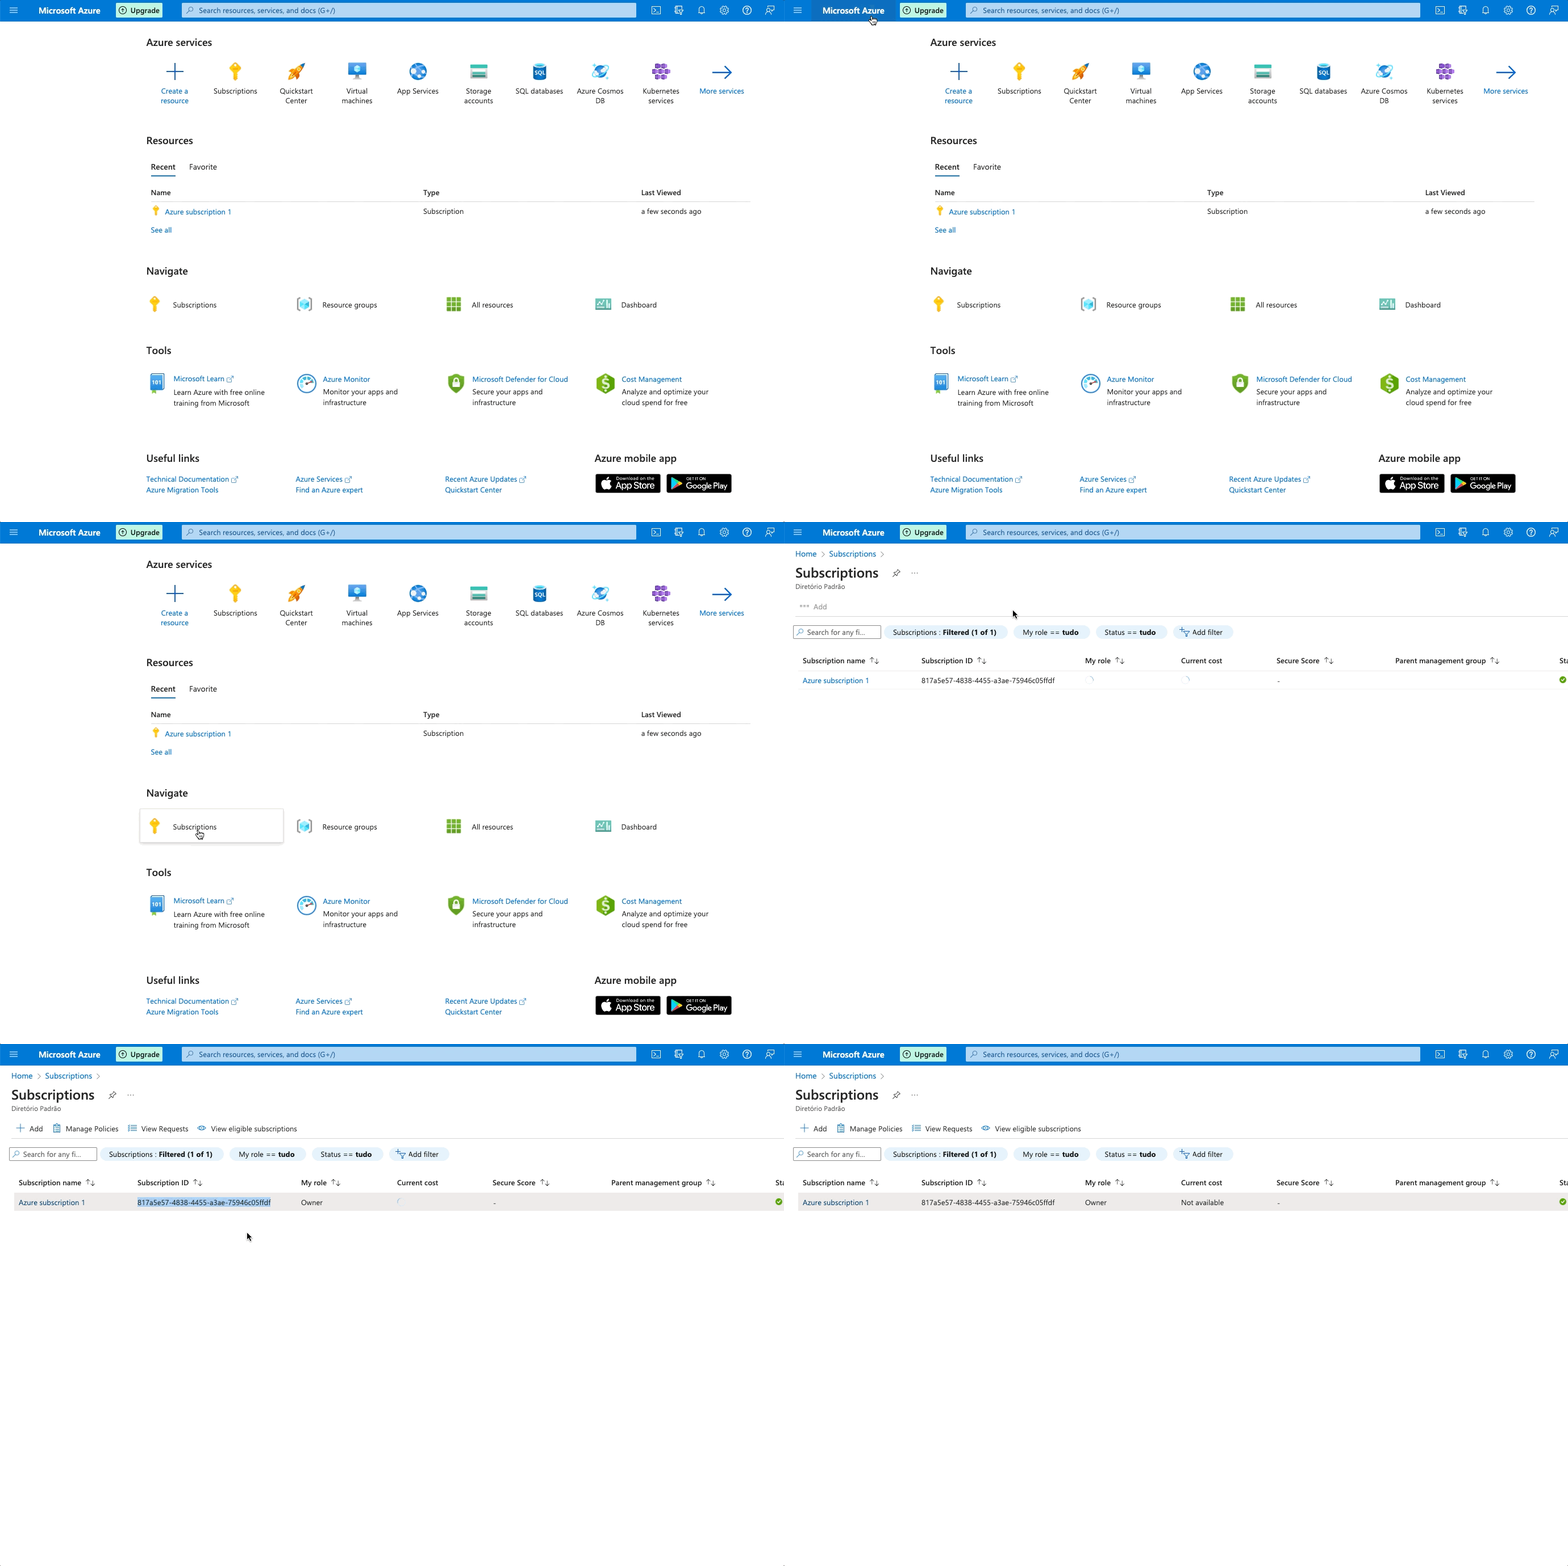
From the Azure page:
- Log in to your Azure Account;
- In the top menu of the Azure Portal, click on the "Subscriptions" button;
- Identify the 'Subscription ID' in the table and copy the data available on the screen;

The Subscription ID is a 35-digit code created when subscribing to an Azure plan. The example ID in this guide is for illustration purposes; you need your ID.
- Open your terminal and log in to the AZ CLI, running the
az logincommand.
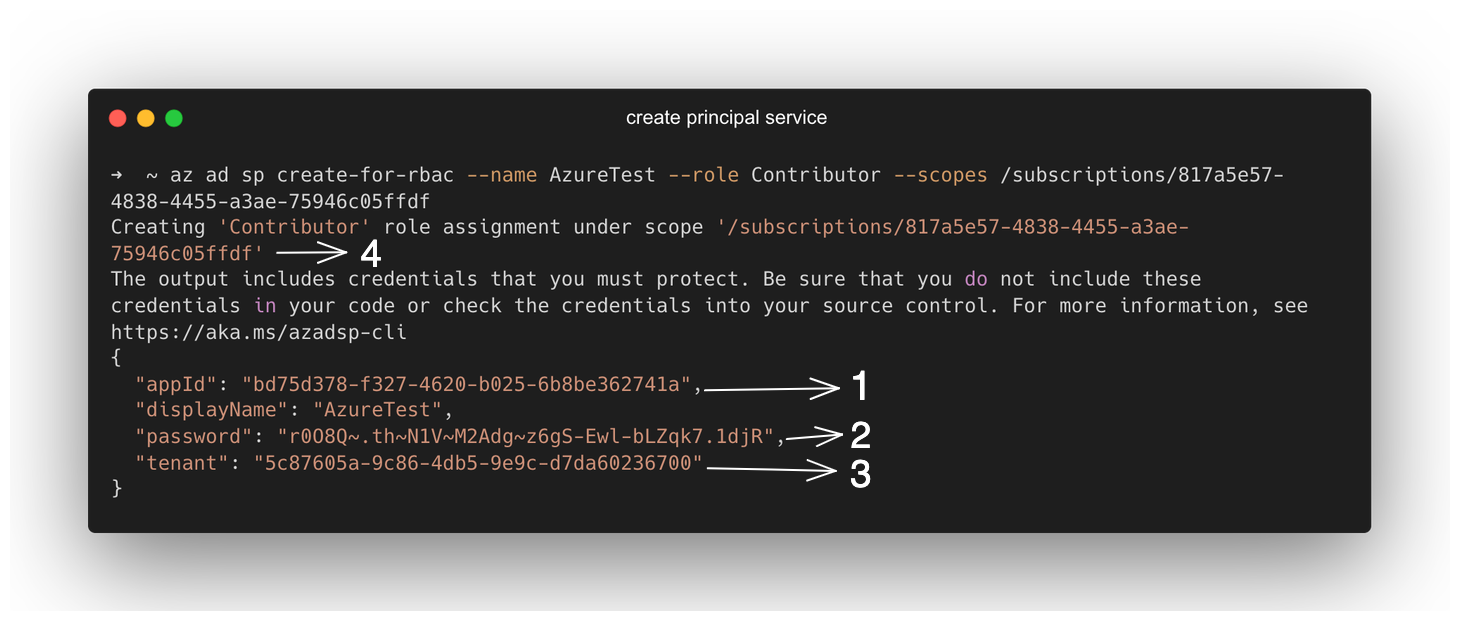
Run the following command:
az ad sp create-for-rbac --name AzureTest --role Contributor --scopes /subscriptions/817a5e57-4838-4455-a3ae-75946c05ffdf
Consider that:
-
az ad sp create-for-rbac: creates a service principal and configures its access to Azure resources. -
--display-name --name -nAzureTest: name of the service entity (or App registration). If not, the default isazure-cli-%Y-%m-%d-%H-%M-%S, where the suffix is the creation time. -
--roleContributor: is the role needed to create and manage resources. You must have at least the Contributor role to continue. Check other predefined roles. -
--scopes/subscriptions/817a5e57-4838-4455-a3ae-75946c05ffdf(subscription id): list of scopes where the service organization role assignment applies. This command is just an example. The “--scopes” attribute must be the “Subscription ID” recovered in step 3.
The terminal will return values needed to configure the account in the StackSpot Workspace:
appId: represents theclient_id.displayName: represents the name.password: represents theclient_secret. Keep this value safe, as you can only see it once in the terminal when it is generated.tentant: represents thetenant_id.
Step 2. Connect your account to your Workspace environment
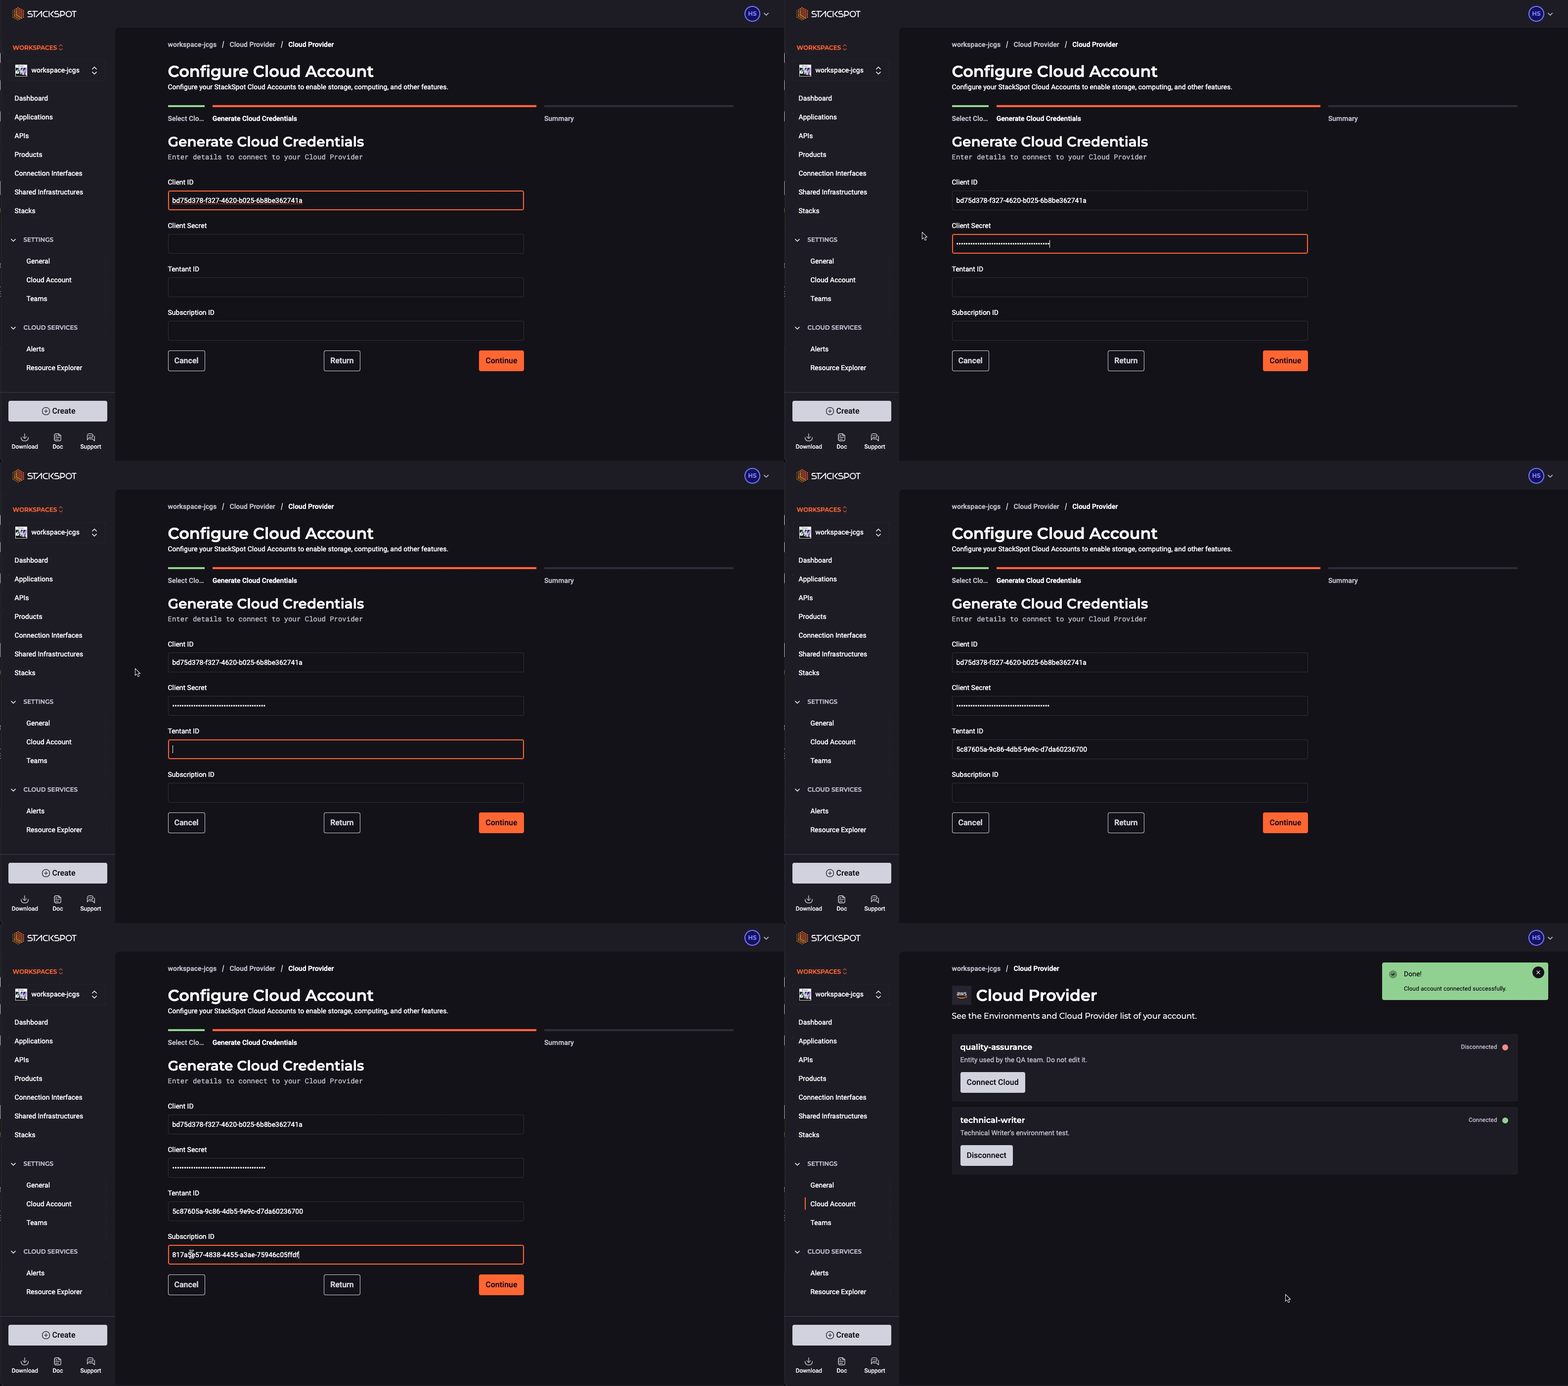
From StackSpot:
-
Access your Workspace;
-
In the left side menu, in Settings, click 'Cloud accounts';
-
Locate the environment you will use and click Connect cloud;
-
Under 'Select Cloud Provider' choose "Azure";
-
Fill in the following:
- Client ID: the appId generated.
- Client Secret: the
passwordgenerated. - Tentant ID: the
tentantgenerated. - Subscription ID: the Subscription ID generated in the Azure Portal.

Using the same Subscription ID, you cannot connect another StackSpot account to the Cloud. Only one StackSpot Account can use it.

Check the data and click 'Continue'.
- Click 'Connect Cloud'.
Next step
- You can deploy the infrastructure of your Application. To do that, see the Deploy section.