Register Application Deployment
In this section, you will find how to register the deployment of an Application in your StackSpot EDP Pipeline to monitor workflows through the Activities screen.
Overview
The deployment in StackSpot EDP works as follows: the Self-Hosted adds steps to your Workflow to provision cloud resources using the Deploy Engine orchestration with your organization's runners. For now, Self-Hosted only supports the GitHub Actions service.
However, on StackSpot EDP, when you deploy an Application, only its infrastructure is deployed.
To deploy the Application itself, you need to use your own CI/CD Pipeline outside the StackSpot Platform. Therefore, to monitor all the Application Workflows, you need to register the deployment using the STK CLI with the following command in your pipeline:
stk register app-deploy
In this way, you can:
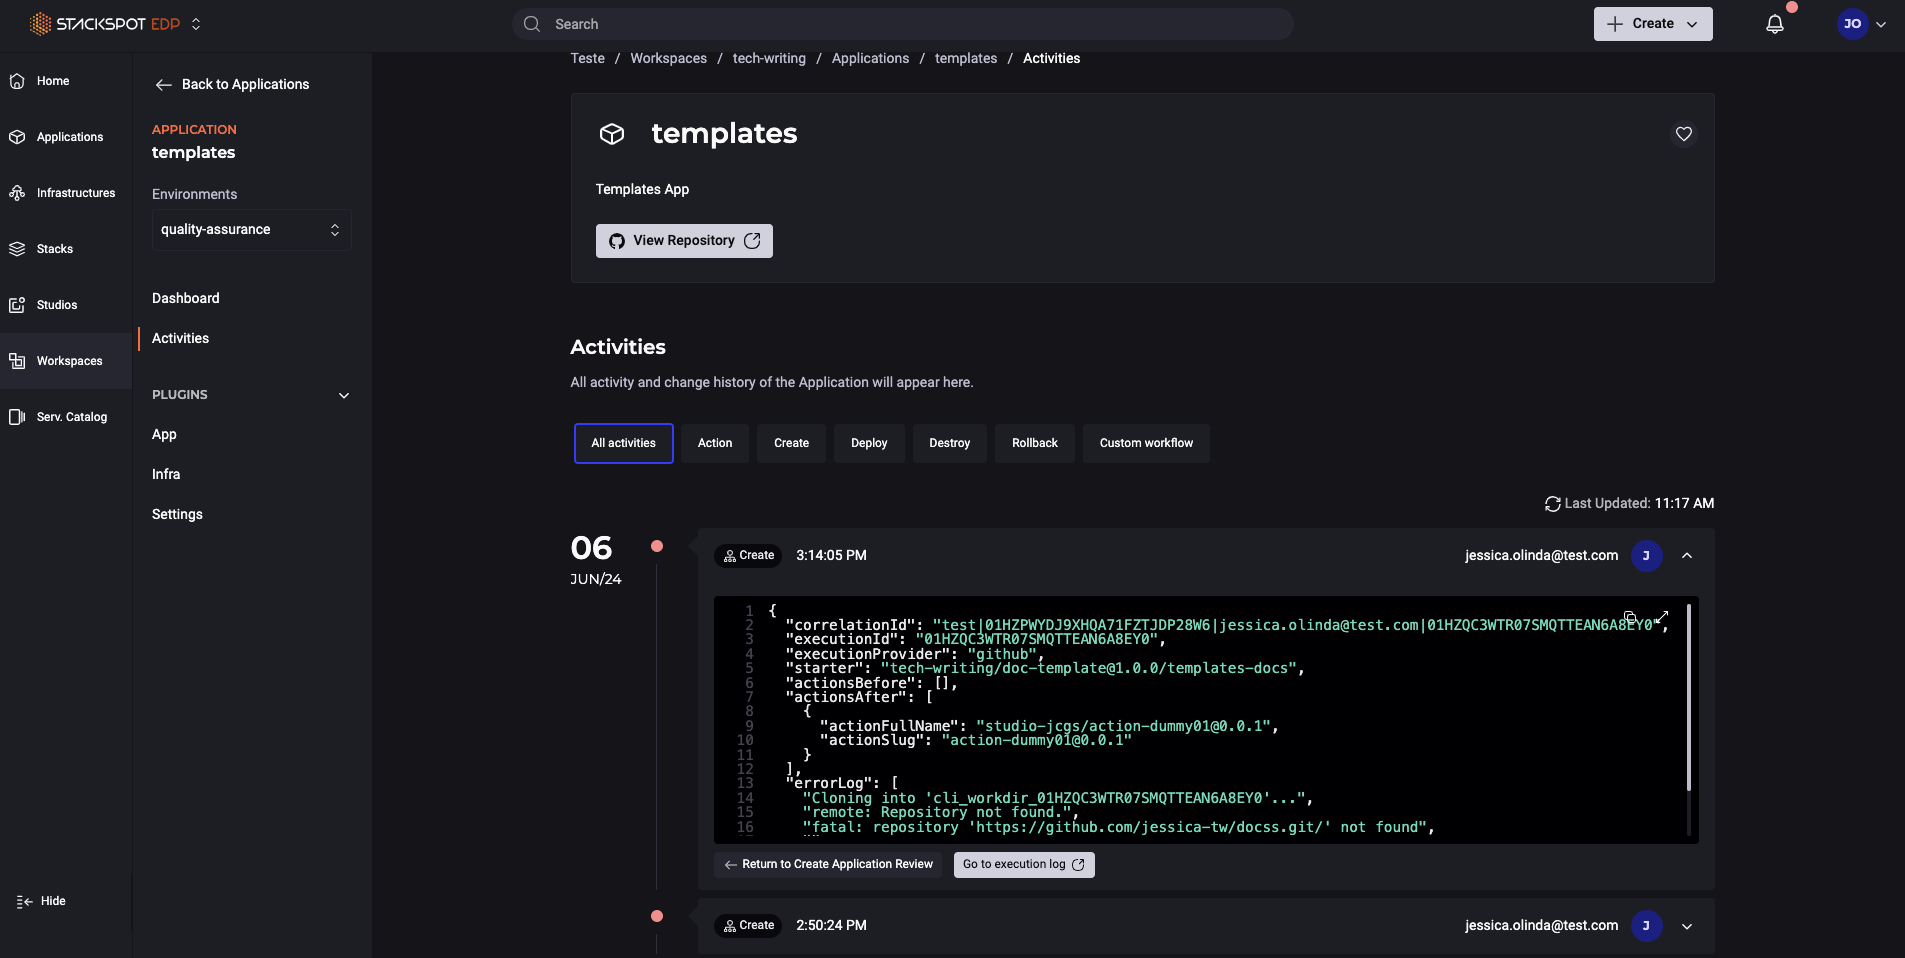
- Inform StackSpot that the deployment was made, allowing you to monitor and track the workflow execution directly on the Platform. Deployment-related activities will be displayed as Activities within the Application, with detailed job execution logs, as shown in the following image:
To view all logs of the Workflow from your Application's repository in the Workspace, you need to configure a Webhook in GitHub. To do this, follow the steps in the guide Configure Webhook to register repository activities on the Activities screen

- View the different versions of Infrastructure and Application in the header of the Application within the StackSpot Portal, as shown in the following image:

Currently, the only supported CI/CD provider for this integration is GitHub Actions.
Check the complete deployment flow in the following diagram:


Follow the steps to integrate the commands into your Pipeline:
Configure integration in your Pipeline:
The stk register app-deploy command must be executed in one of the workflow steps where the Application deployment will be done in your Pipeline.
The command sends the version being deployed, the environment, the status (success or error), and the Application's manifest content in the Workspace on the StackSpot Platform. Check an example below:
stk register app-deploy --version 1.3.1 --environment dev --status success
There are two ways to integrate these commands into your Pipeline:
- Automated, via an Action (recommended); or
- Manually.
Check the steps for both methods below:
1. Integrate commands in the Pipeline via Action (recommended)
The Action is available on the StackSpot Marketplace and performs the following automations in your pipeline:
- Installs the STK CLI in your pipeline (if not already installed);
- Authenticates with Client_ID, Client_KEY, and REALM;
- Integrates and executes the
stk register app-deploy,stk register app-destroy, andstk delete appcommands;
To use it, follow these steps:
Step 1. Configure the CI/CD authentication keys in the repository where your Application is located. For this, follow the steps in the Authenticate via CICD guide.
Step 2. Add the Action to the deployment workflow of your Application. To do this, copy the code snippet below and paste it into your file:
- Deploy with success status:
- uses: stack-spot/
cli-github-action-run-command@v1.0.0
        id: stk-register-app-deploy-success
        with:
          client_id: ${{ secrets.CLIENT_ID }}
          client_key: ${{ secrets.CLIENT_KEY }}
          realm: ${{ secrets.REALM }}
          command_stk: "register app-deploy --target my-app/ --version 1.0.0 --env dev --status success"
- Deploy with error status:
      - uses: stack-spot/
      cli-github-action-run-command@v1.0.0
        id: stk-register-app-deploy-fail
        with:
          client_id: ${{ secrets.CLIENT_ID }}
          client_key: ${{ secrets.CLIENT_KEY }}
          realm: ${{ secrets.REALM }}
          command_stk: "register app-deploy --target my-app/ --version 1.0.0 --env dev --status error"
Step 3. Configure the flags of the stk register app-deploy command with the correct variables:
target: path to the application directory;version: version of the application being deployed;env: deployment environment;status: deployment status (error, success)
For more information, visit the stk register-app deploy command page
To register the deployment of the Application, you need to be within a Workspace. To execute commands that require an active Workspace, add the command_stk: "use workspace [workspace-name]" command before those commands, as in the example below:
- uses: stack-spot/cli-github-action-run-command@v1.0.0
        id: stk-delete-app
        with:
          client_id: ${{ secrets.CLIENT_ID }}
          client_key: ${{ secrets.CLIENT_KEY }}
          realm: ${{ secrets.REALM }}
          command_stk: "use workspace my-workspace-name"
          command_stk: "register app-deploy --target my-app/ --version 1.0.0 --env dev --status error"
2. Integrate commands in the Pipeline Manually
For your convenience, StackSpot recommends using the Action. However, you can configure the steps manually in your pipeline.
Prerequisites
- Register
Client_ID,Client_Key, andRealmdata of your Access Token as GitHub secrets; - STK CLI installed in your pipeline;
- Perform authentication in the Pipeline;
- Have an active Workspace in your Pipeline.
After following the previous steps, the pipeline file should look like the following example:
name: Run CLI Commands

on: [push]

jobs:
  deploy:
    runs-on: ubuntu-latest
    env:
      LANG: C.UTF-8
      LANGUAGE: C.UTF-8
      LC_ALL: C.UTF-8
      PYTHONIOENCODING: utf-8

    steps:
      - name: Check out repository code
        uses: actions/checkout@v4

      - name: Download STK CLI
        shell: bash
        run: |
          curl \
            --fail \
            --http2-prior-knowledge \
            --location \
            --output /tmp/stk.deb \
            --silent \
            --show-error \
            --tlsv1.3 \
            https://stk.stackspot.com/installer/linux/stk.deb

      - name: Install STK CLI
        shell: bash
        run: |
          sudo dpkg --install /tmp/stk.deb || echo "Installation failed with exit code: $?"

      - name: Authenticate StackSpot
        run: |
          $HOME/.stk/bin/stk login --client-id ${{ secrets.CLIENT_ID }} --client-key ${{ secrets.CLIENT_KEY }} --realm ${{ secrets.CLIENT_REALM }}

      - name: Use your Workspace
        run: |
          $HOME/.stk/bin/stk use workspace <workspace>
After configuring all the steps, add the following command execution as the next step in the pipeline to register the deployment of your Application:
- name: Register App Deployment
        run: |
          stk register app-deploy --target my-app/ --version 1.0.0 --status success