Pipelines Installation
In this section, you will find how to install STK CLI in a pipeline.
To install and authenticate STK CLI in a pipeline, you need a StackSpot account.
Prerequisites
See below the requirements:
- Enterprise account on the StackSpot Platform.
- Create or use a service credential.
Installation on your own runner**
1. Configure environment variables
To ensure the correct functioning of the STK CLI, especially in the runners of your pipeline. Configure the following environment variables in your pipeline:
LANG: C.UTF-8
LANGUAGE: C.UTF-8
LC_ALL: C.UTF-8
PYTHONIOENCODING: utf-8
Check the documentation for your CI/CD service:
Also configure the environment variables on your system:
- Environment Variables in Windows
- Environment variables on Linux and MacOS systems
- On the taskbar, search for "variables" and access the "Edit environment variables" option;
- In the open window, click on the "New..." option. Then, fill in the name and value of the variable and click "OK";
The name and value of the variables follow the pattern below:
NAME: variable-Value
Example:
Variable name: NAME
Variable value: variable-Value
Repeat filling for all variables below:
LANG: C.UTF-8
LANGUAGE: C.UTF-8
LC_ALL: C.UTF-8
PYTHONIOENCODING: utf-8
- In the terminal, run the following command to open the
.bashrcfile:
nano ~/.bashrc
Or open the file with your preferred text editor.
- At the end of the file, enter all variables as follows:
export LANG=C.UTF-8
export LANGUAGE=C.UTF-8
export LC_ALL=C.UTF-8
export PYTHONIOENCODING=utf-8
- Save and close the file. Then, return to the terminal and run the command below to apply the changes:
source ~/.bashrc
If you want to check the environment variables, type the command in the terminal:
printenv
2. Install packages on your runner
Install the following packages on your runner:
jq;curl;git.
Example:
See the installation of the jq tool on a Linux runner on GitHub:
name: Build on Ubuntu
on: push

jobs:
 build:
   runs-on: ubuntu-latest
   steps:
     - name: Check out repository code
       uses: actions/checkout@v4
     - name: Install jq tool
       run: |
         sudo apt-get update
         sudo apt-get install jq
For more examples, visit the GitHub documentation on customizing runners.
Install via curl on the pipeline
Use in your pipeline the code in the steps below to install StackSpot:
curl -fsSL https://stk.stackspot.com/install.sh | bash && exec $SHELL
Example:
steps:
 - name: Install StackSpot
   run: |
   curl -fsSL https://stk.stackspot.com/install.sh | bash && exec $SHELL
Installing via curl also works for local usage, but only in Unix systems, like Linux and MacOS.
Authenticate via CI/CD
The Enterprise account supports the STK CLI authentication via the command line, using a client id and a client key.
This kind of authentication allows you to have an active session, and you can configure the expiration time to use STK CLI via the command line, for example, in CI/CD pipelines.
The session expiration time is 20 minutes. You can configure this time soon via the StackSpot Portal.
Get keys and authenticate in your pipeline
To authenticate via the pipeline, you must get the keys in the StackSpot Platform. Afterward, you must inform them with the stk login command.
To do that, follow the steps below:
Step 1. Log in the StackSpot Platform;
Step 2. On the first page, access the Manage Account page and then, click Access Tokens;
Step 3. Authorize the Token usage and click 'Generate Tokens'.


Keys are generated per user of the organization. If a user generates a new key, the previous one will automatically become invalid. Generating a new key does not invalidate the keys of other users in that organization.
Step 4. In your pipeline, execute the command below, replacing the values between quotes with the new values you got in the previous step:
Add the command below with the < >
stk login --client-id <ID> --client-key <KEY> --realm <REALM>
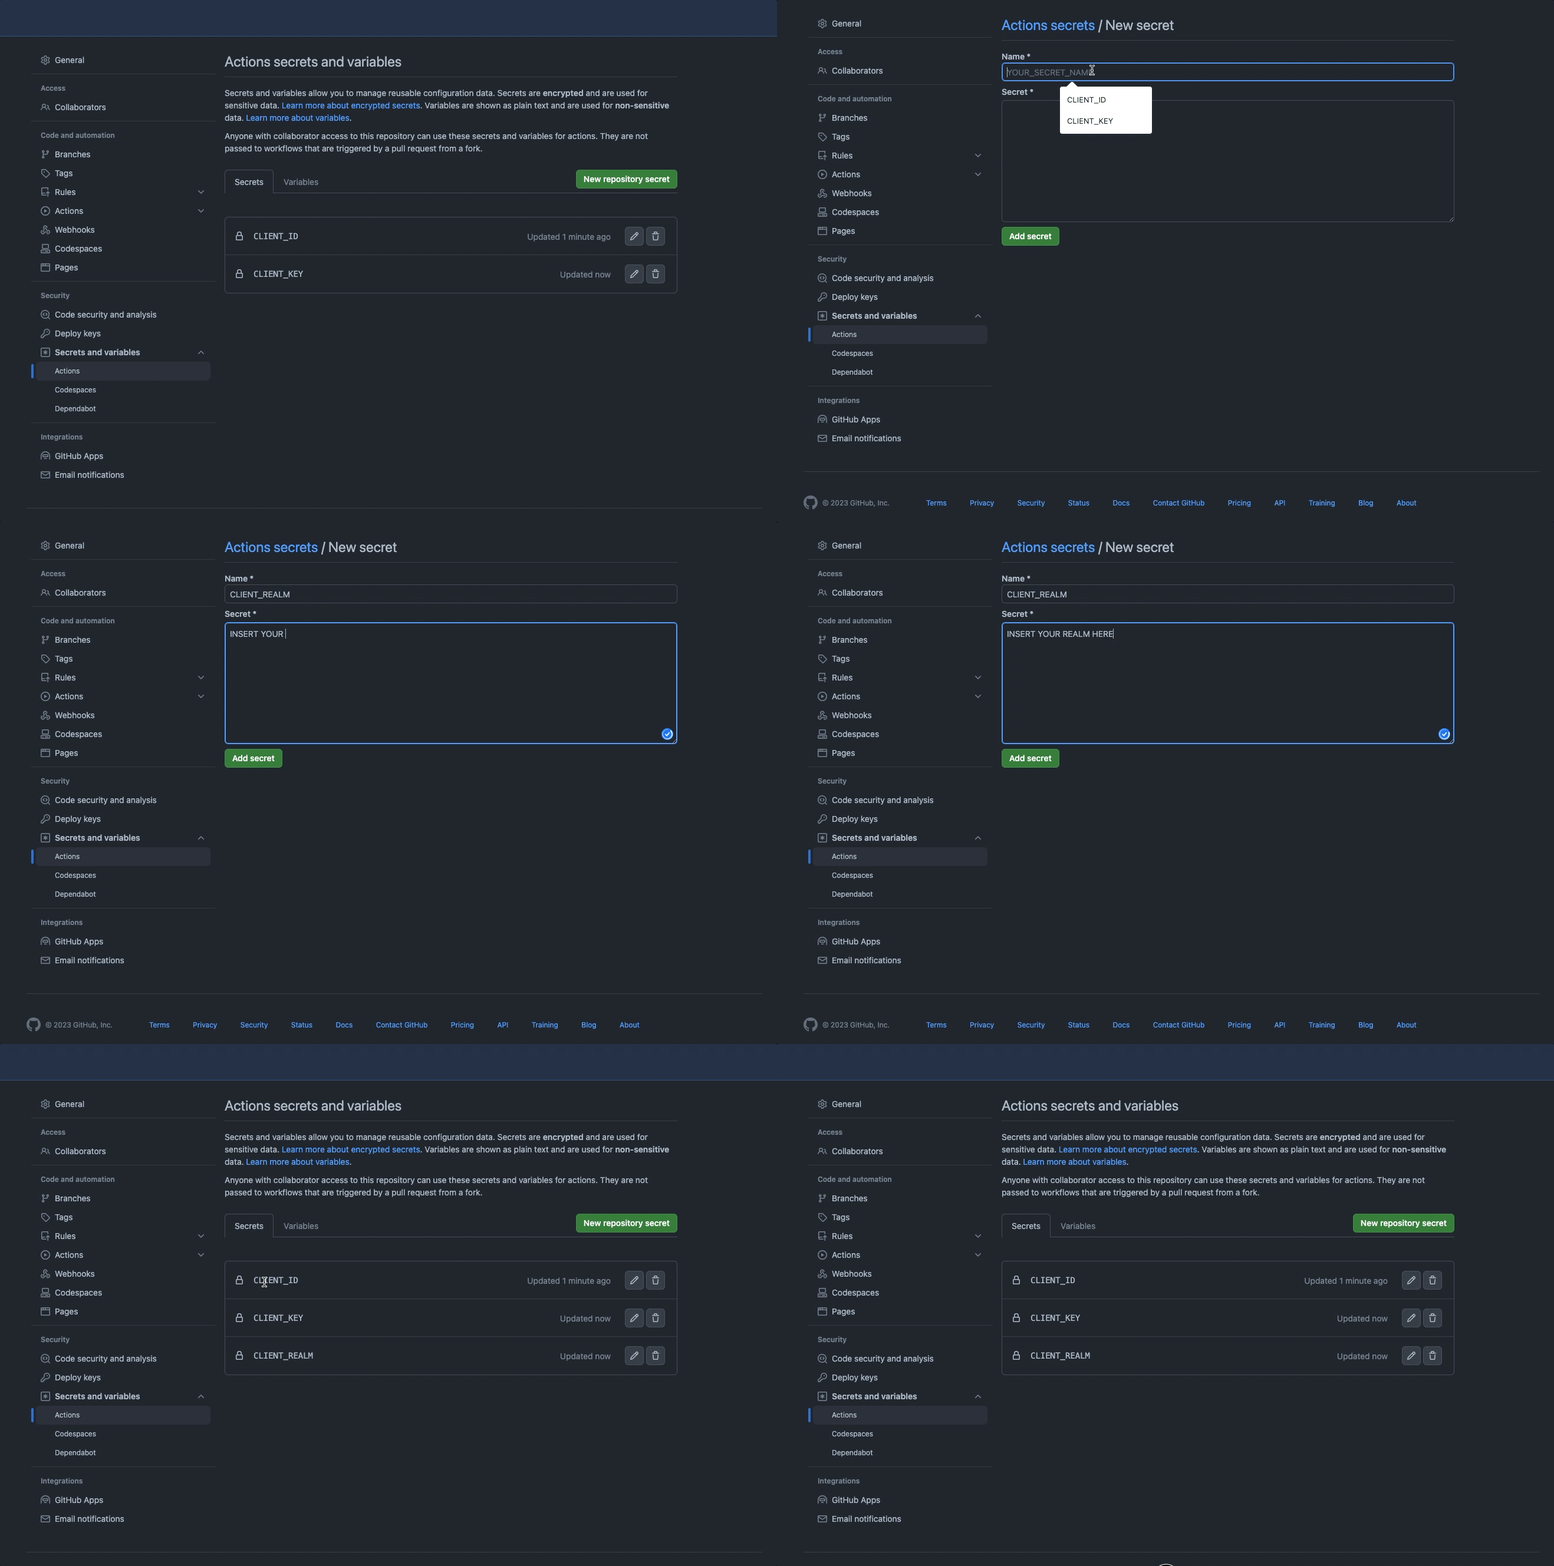
Register your Token as a secret in Action on GitHub
Example:
Client IDasCLIENT_IDin the secret;Client KeyasCLIENT_KEYin the secret;RealmasCLIENT_REALMin the secret;

Use in your pipeline:
steps:
 - name: Config login
   with:
    CLIENT_ID: ${{ secrets.CLIENT_ID }}
    CLIENT_KEY: ${{ secrets.CLIENT_KEY }}
    CLIENT_REALM: ${{ secrets.CLIENT_REALM }}
For more details, follow the secrets usage on the GitHub Actions documentation.
Running the STK CLI with GitHub-hosted runners
If you will be using a GitHub-hosted runner to run the STK CLI in your workflow, use the following example in your pipeline file:
- Set up GitHub Secrets.
- [Optional] Add any STK CLI commands you need.
- [Optional] Change the
name: Run CLI Commandsfield to change the name of the Workflow and theon: [push]field to change when it runs.
name: Run CLI Commands

on: [push]

jobs:
  deploy:
    runs-on: ubuntu-latest
    env:
      LANG: C.UTF-8
      LANGUAGE: C.UTF-8
      LC_ALL: C.UTF-8
      PYTHONIOENCODING: utf-8

    steps:
      - name: Check out repository code
        uses: actions/checkout@v4

      - name: Download STK CLI
        shell: bash
        run: |
          curl \
            --fail \
            --http2-prior-knowledge \
            --location \
            --output /tmp/stk.deb \
            --silent \
            --show-error \
            --tlsv1.3 \
            https://stk.stackspot.com/installer/linux/stk.deb

      - name: Install STK CLI
        shell: bash
        run: |
          sudo dpkg --install /tmp/stk.deb || echo "Installation failed with exit code: $?"

      - name: Authenticate StackSpot
        run: |
          $HOME/.stk/bin/stk login --client-id ${{ secrets.CLIENT_ID }} --client-key ${{ secrets.CLIENT_KEY }} --realm ${{ secrets.CLIENT_REALM }}