Editar Workflow (Descontinuado)
Nesta seção, você encontra os passos para editar informações de um Workflow.
Este conteúdo está sendo descontinuado, conheça o novo Workflow da StackSpot.
Editar informações básicas de um Workflow
Você pode editar nome e descrição de um Workflow. Este é o mesmo fluxo para Workflows padrão e de Stacks específicas. Confira os passos:
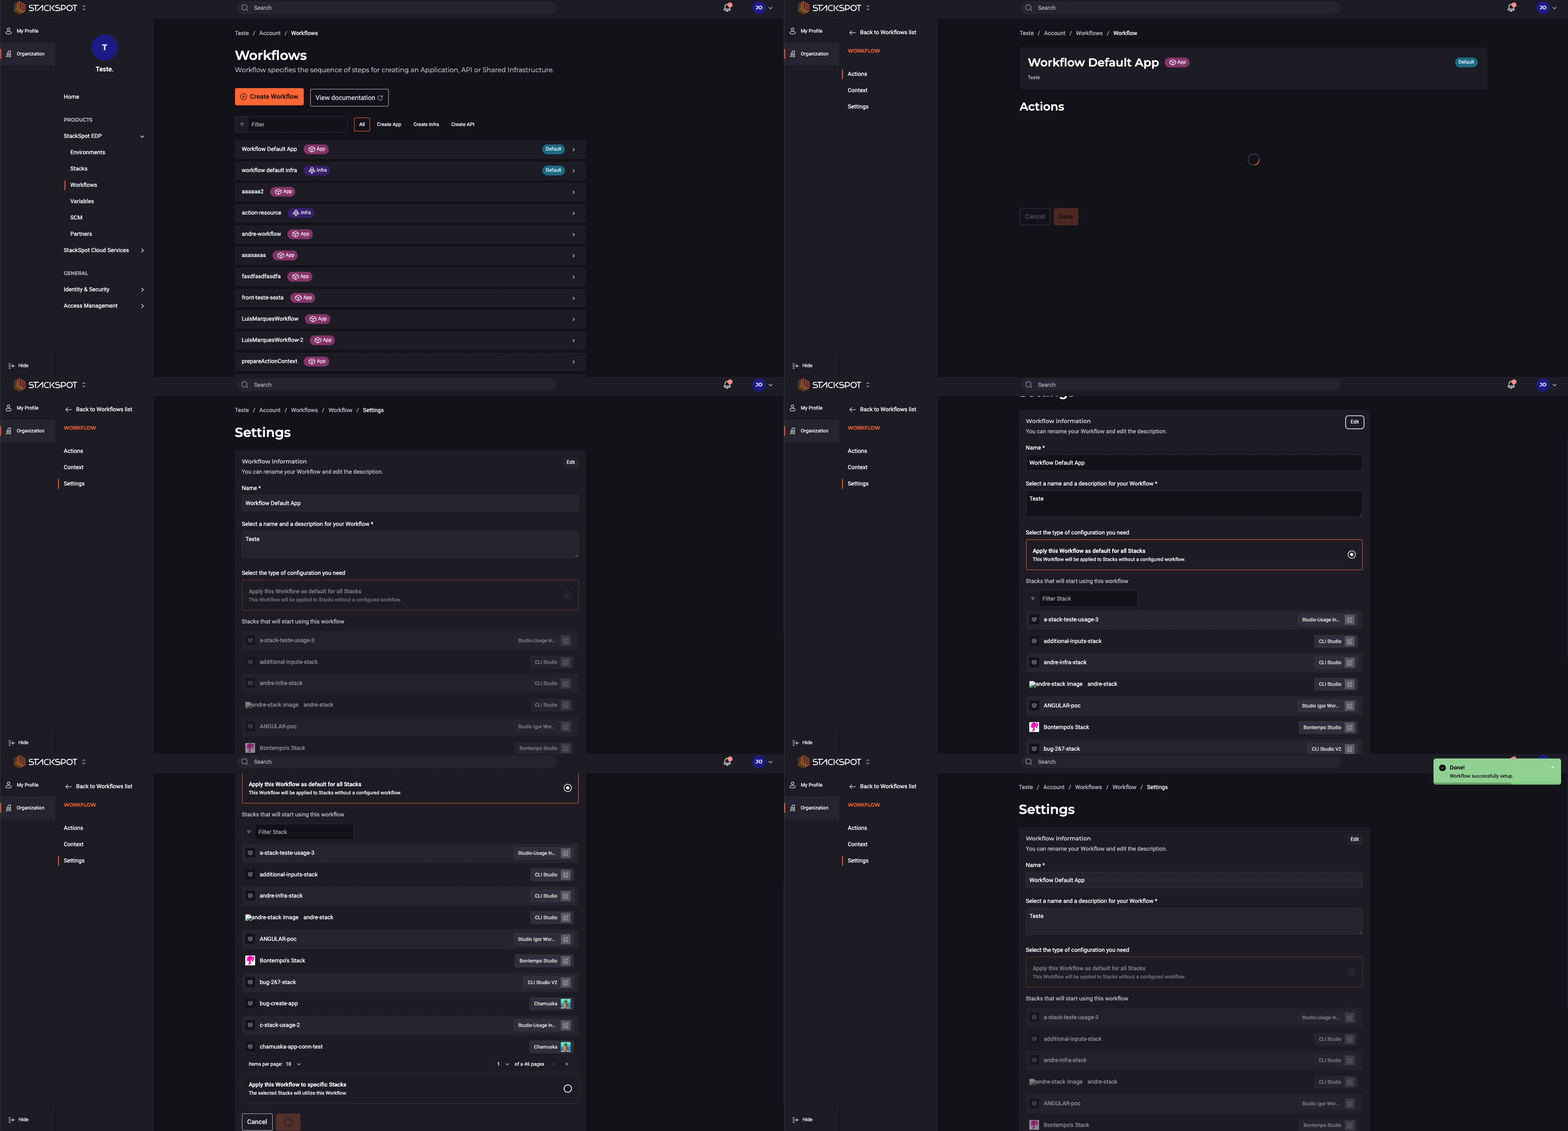
Passo 1. Faça login no Portal StackSpot EDP e clique no seu perfil e depois no botão 'Organização';
Passo 2. Clique no botão 'StackSpot EDP' e depois no botão 'Workflow';
Passo 3. Selecione o Workflow que você quer editar;
Passo 4. Clique em 'Configurações';
Passo 5. Agora, clique no botão 'Editar';
Passo 6. Faça as edições necessárias e clique no botão 'Salvar'.
Confira estes passos no GIF:

O GIF está em inglês.
Editar Stacks de um Workflow não padrão
Você pode associar ou remover Stacks de Workflows configurados para Stacks específicas. Confira os passos a seguir:
Como associar Stacks:
Passo 1. Faça login no Portal StackSpot EDP e clique no botão 'Organização';
Passo 2. Em 'Organização' clique em 'Workflow';
Passo 3. Selecione o Workflow que você quer associar ou desassociar Stacks;
Passo 4. Clique no botão 'Configurações';
Passo 5. Clique no botão 'Editar';
Passo 6. Depois da caixa de seleção 'Aplicar Workflow a Stacks específicas' clique no botão 'Adicionar Stacks';
Passo 7. Procure pelas Stacks que você quer adicionar, selecione-as e clique no botão 'Salvar'.
Pronto, você adicionou mais Stacks ao seu Workflow.
Como remover Stacks:
Passo 1. Faça login no Portal StackSpot EDP e clique no botão 'Organização';
Passo 2. Clique em 'Workflow';
Passo 3. Selecione o Workflow que você quer associar ou desassociar Stacks;
Passo 4. Clique em 'Configurações';
Passo 5. Clique no botão 'Editar';
Passo 6. Depois da caixa de seleção 'Aplicar Workflow a Stacks específicas', você encontra a lista de Stacks associadas ao seu Workflow. Clique no botão de deletar (ícone de lixeira) ao lado da Stack que você deseja remover;
Passo 7. Escreva a palavra "Deletar" dentro do modal de confirmação e clique em no botão 'Deletar' novamente.
Pronto, você removeu Stacks do seu Workflow.
Editar Actions de um Workflow
Ao adicionar uma nova Action a um Workflow, verifique se você também precisa configurar o Contexto.
Passo 1. Faça login no Portal StackSpot EDP e clique no botão 'Organização';
Passo 2. Clique em 'Workflow';
Passo 3. Selecione o Workflow que você quer adicionar ou remover Actions;
Passo 4. Dentro do Workflow, clique em 'Actions';
Passo 5. Aqui você pode executar duas ações:
- Para adicionar Actions novas ao Workflow: clique no botão 'Adicionar Actions' e selecione as que desejar. Clique em 'Salvar'.
- Para remover Actions do Workflow: clique no botão 'Deletar' (ícone de lixeira) ao lado da Action.
Caso você tenha adicionado Actions, siga para a seção de 'Contexto' para configurar seus inputs para a Conta.
Editar Contexto das Actions de um Workflow
Você pode editar o Contexto das Actions de um Workflow.
Isso quer dizer que você pode definir os valores dos inputs das Actions como padrão para toda a Conta e até defini-los como mandatórios. Ou seja, você pode configurar o Contexto dessas Actions a nível de Conta.
Confira o passo a passo:
Passo 1. Faça login no Portal StackSpot EDP e clique no botão 'Organização';
Passo 2. Clique em 'Workflow';
Passo 3. Selecione o Workflow que você quer editar o Contexto;
Passo 4. Dentro do Workflow, clique em 'Contexto';
Passo 5. Clique no botão ao lado da Action que você quer editar o contexto e faça as edições dos inputs;
Passo 6. Clique no botão 'Salvar' e repita o processo para todas as Actions que você quer editar.
Pronto, você editou o Contexto das Actions do seu Workflow.
Transformar Workflow padrão em Workflow de Stacks específicas
Ao transformar um Workflow padrão em um Workflow de Stacks específicas, as Stacks que não possuírem nenhum Workflow configurado ficarão sem qualquer Workflow associado.
Passo 1. Faça login no Portal StackSpot EDP e clique em 'Acessar Conta';
Passo 2. Em 'Organização', clique em 'Workflow';
Passo 3. Selecione o Workflow que você quer editar;
Passo 4. Clique em 'Configurações';
Passo 5. Clique no botão 'Editar';
Passo 6. No final da tela, selecione 'Aplicar Workflow para Stacks específicas' e clique no botão 'Adicionar Stacks'. Como na imagem a seguir:

Passo 7. Procure pelas Stacks que você quer adicionar, selecione-as e clique em 'Salvar'.
Transformar Workflow de Stacks específicas em Workflow padrão
Caso já exista um Workflow padrão na sua conta, você não pode executar esta ação. Para isso, você precisa primeiro:
Passo 1. Faça login no Portal StackSpot EDP e clique em 'Acessar Conta';
Passo 2. No menu lateral esquerdo, dentro de 'Organização', clique em 'Workflow';
Passo 3. Selecione o Workflow que você quer editar;
Passo 4. Clique em 'Configurações';
Passo 5. Clique no botão 'Editar' no canto direito superior da tela de informações do Workflow;
Passo 6. Role para o final da tela e selecione 'Aplicar Workflow como padrão para todas as Stacks', como na imagem:

Esta imagem está em inglês.
Pronto, você transformou esse Workflow em padrão.