GitHub
In this section, you will learn how to configure your SCM integration with GitHub.
You can integrate your
- Create Application;
- Create Infrastructure;
- Apply Plugins;
- Run Actions.
Requirements
1. Repository for the pipelines
The first step to integrating SCM with StackSpot is to have your organization's repository for pipelines. When defined, you can remotely request them via API, informing your input data for each flow.
You can use an existing one or create a new one.Check it out here how to create a repository on GitHub.
2. Generate the Personal Access Token on GitHub
- You need to have writing permission on the workflow repository to follow the next steps
You need to generate a PAT on GitHub. Follow the instructions:
- Access your GitHub account and login;
- On the top right menu, click on your photo and then on 'Settings';
- On the left side menu, at the end of the menu, click on 'Developer Settings';
- On the left side menu, click on 'Personal Access Tokens' then on the same menu, click on the option 'Tokens Classic';
- Within the section, on the left of the page, locate and click on the button 'Generate new Token' and select the option 'Generate new Token (classic)';
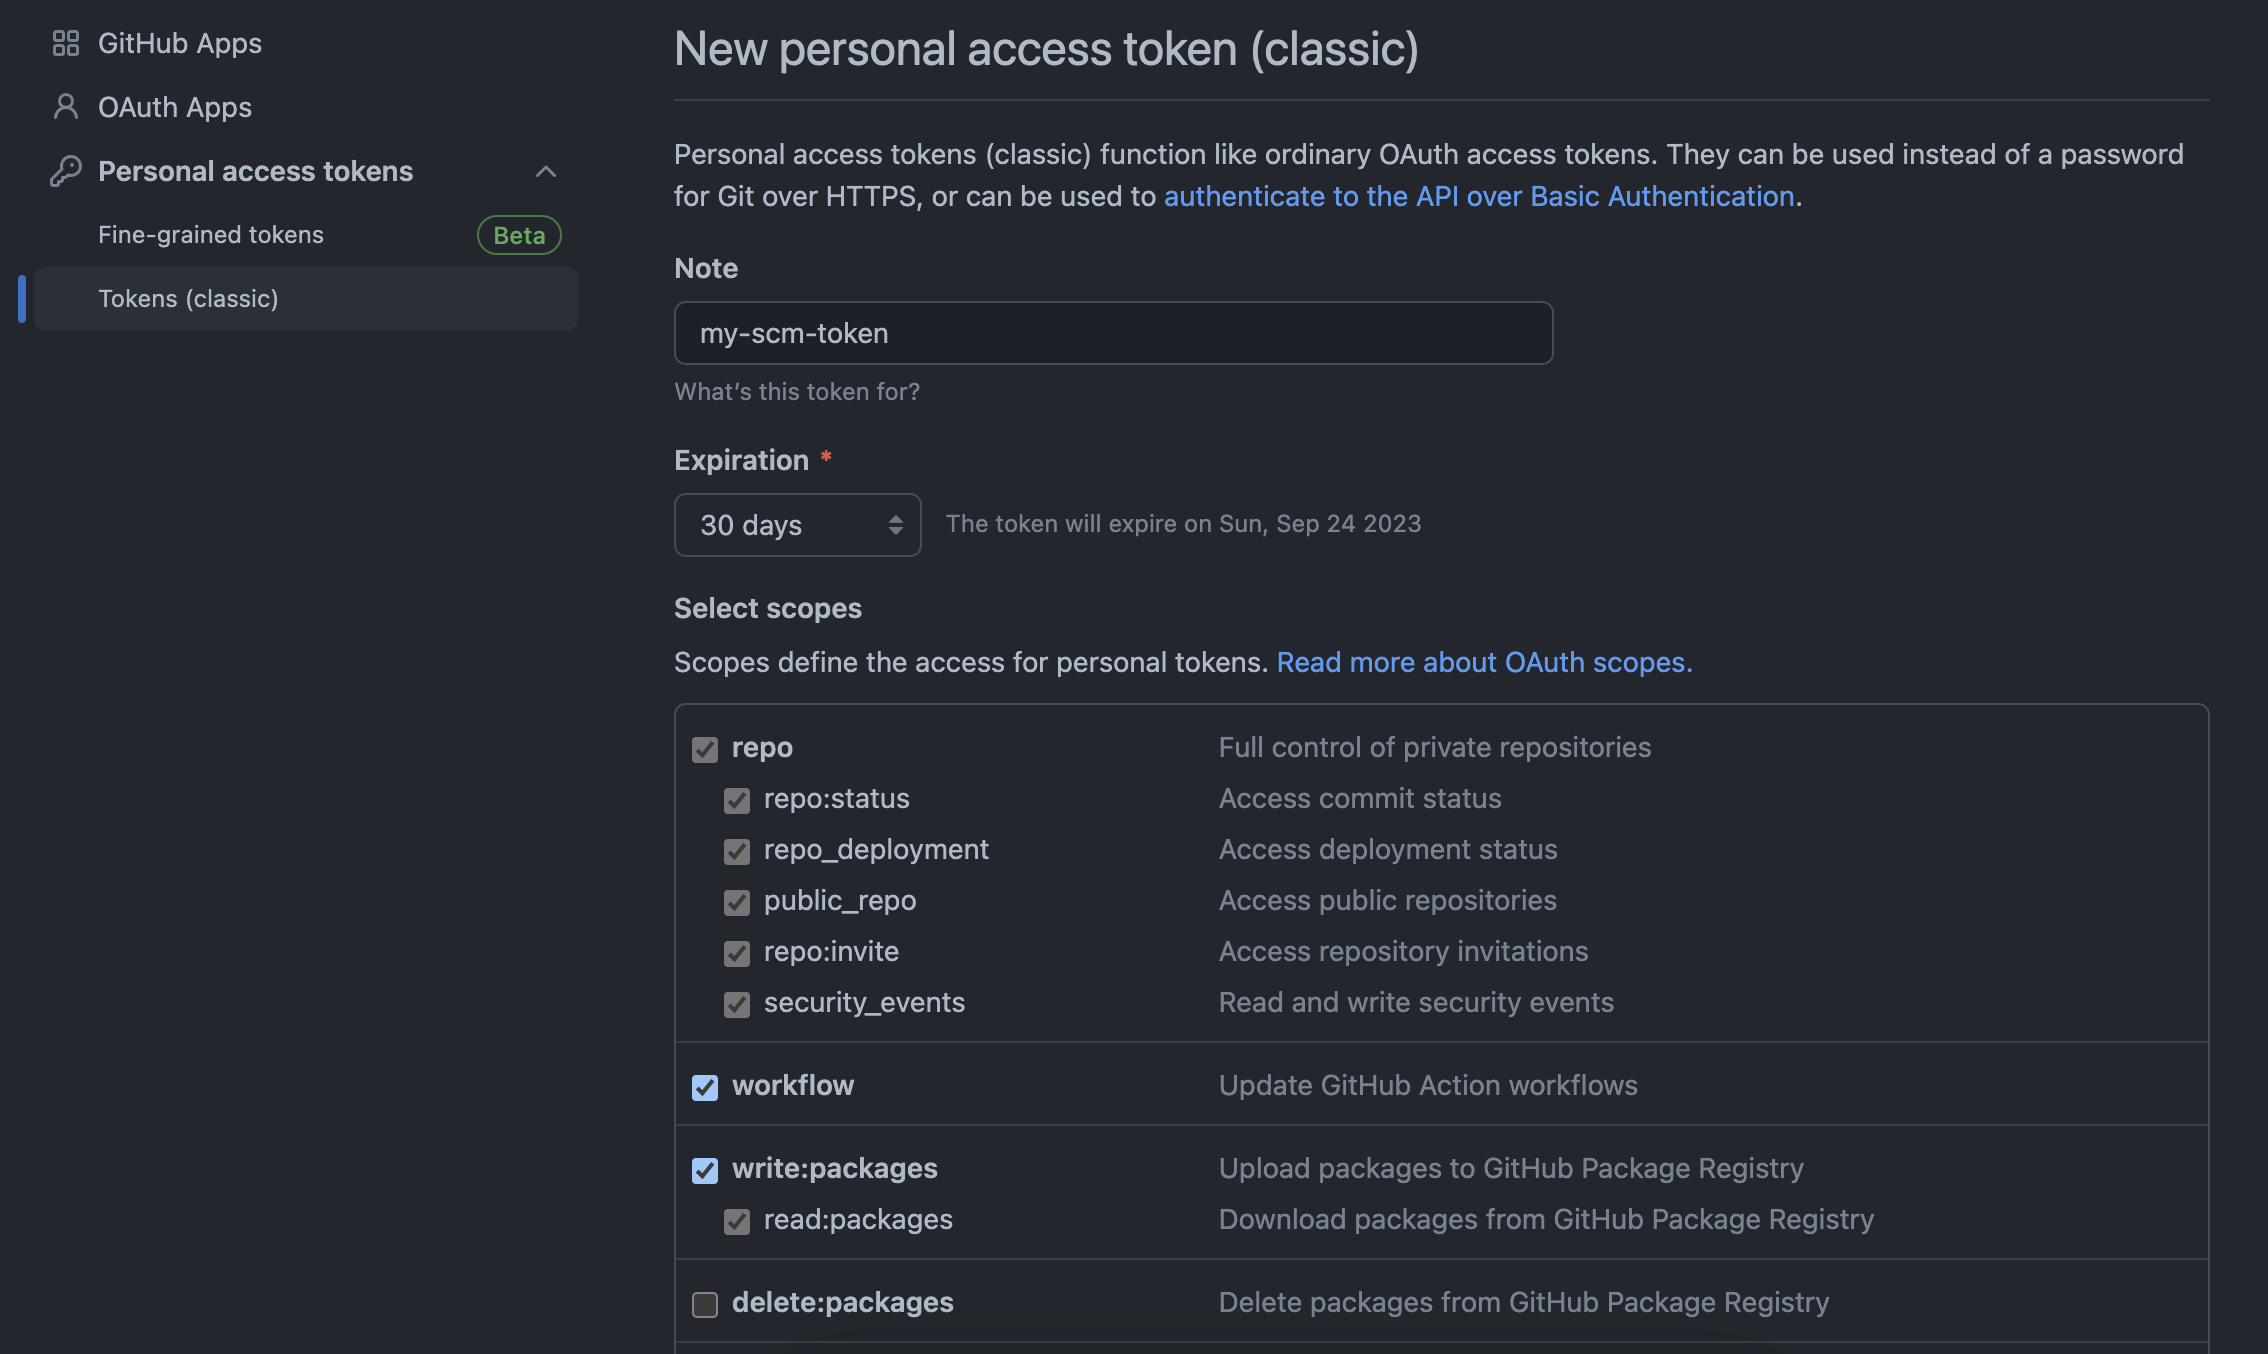
- The form "New personal access token (classic)" is loaded, then fill in the field 'Note' with the description of the token purpose. Then click the "Expiration" button and select or set an expiration date for your token;
- Then, in the "Select scopes" section, check the following checkboxes in sequence:
- All "repo" options:
- repo:statusAccess;
- repo_deployment;
- public_repo;
- repo:invite;
- security_events.
- The option "workflow";
- The "write:packages" option.
As in the image below:

The scopes may depend on the activities your company needs to perform. So, select all the ones that are necessary for you.
-
At the bottom of the page click on the 'Generate Token' button. The generated code will be displayed temporarily, copy and save the generated code.
-
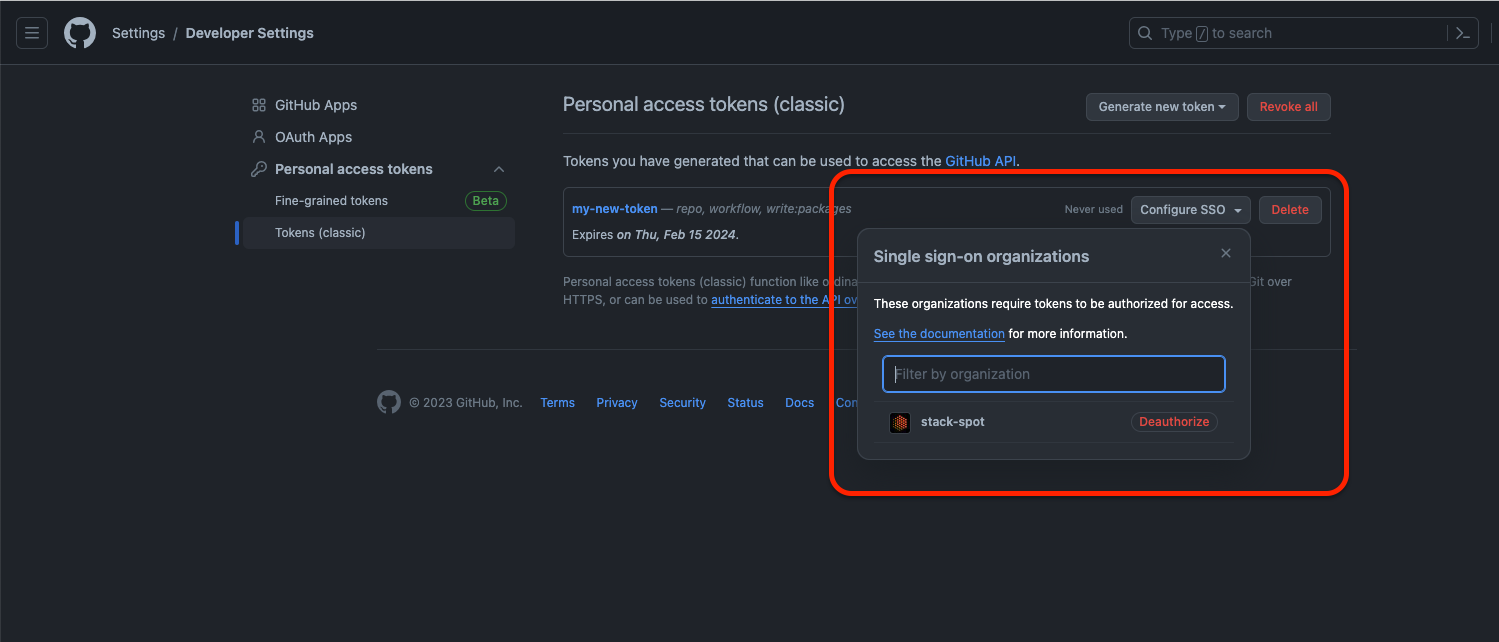
(Optional) If your organization has login via SSO (Single Sign On) configured, authorize your Token in your organization:
- On GitHub, go to 'Settings' and then 'Developer Settings' and in your token, click on 'Configure SSO':

Then, check if your token was authorized as per the example below:

Then, check if your token was authorized.
For more information about the Personal Access Token, see GitHub documentation.
Configure pipelines automatically (Recommended)
You will follow the steps below via STK CLI. To automatically create pipelines, you need a repository. Check how to create a GitHub repository.
Step 1. Open your terminal and clone the Action repository:
git clone https://github.com/stack-spot/stackspot-workflows-action.git
The content is saved inside your current folder.
Step 2. Go to your repository's folder you've cloned. Execute the command below:
cd stackspot-workflows-action
stk run action .
Step 3. The terminal asks what your SCM provider is. Select the GitHub option.
Step 4. Answer the following questions:
- Personal Access Token: Enter the Personal Access Token previously generated on GitHub.
- Organization name: Enter your GitHub username.
- Repository Name: Enter the name of the repository you created to run StackSpot Workflows.
If the specified repository exists and the main branch also exists in it, a Pull Request will be created for main.
If the repository does not exist, the Action creates the repository and the main branch.
The token user and the Personal Access Token itself must have permission to write to the organization's repository. If the repository does not exist, you must add permission to create repositories.
In some SCMs, the Project Name and Repository Name can mean the same thing. Check below how to identify in the URL:
https://github.com/[GITHUB-USERNAME]/[REPOSITORY-NAME]
Example:
https://github.com/stack-spot/stackspot-workflows-action
For more information, see GitHub's documentation.
This is not the Personal Access Token from StackSpot Platform.
- Create a repository: This option appears in the terminal if the Action does not find any repository, you must enter the option Yes to create a new repository. If you answer No the Action will be closed.
Done! You executed the Action.
Check your GitHub Repository. In the Actions section. You will see 'StackSpot workflow dispatch' configured.
In your GitHub project settings, the Webhook is already configured.
If the setup was successful, the next step is to integrate GitHub with your StackSpot account. If it was not possible to complete the configuration automatically, follow the steps below to carry out the entire configuration manually:
Create the repository and pipelines manually
Step 1. On your STK CLI terminal execute the commands:
mkdir <repo-name>
cd <repo-name>
mkdir .github
cd .github
mkdir workflows
Check an example:
mkdir repo-runner-actions
cd repo-runner-actions
mkdir .github
cd .github
mkdir workflows
Step 2. Create the "middle-flow.yml" file on the ".github/workflows" path with the following:
name: Stackspot workflow dispatch
run-name: ${{ inputs.correlation_id }}
on:
  workflow_dispatch:
    inputs:
      correlation_id:
        description: Correlation id
        required: true
      workflow_name:
        description: Workflow path
        required: true
      secrets:
        description: Secrets info (json)
        required: true
      api_inputs:
        description: Workflow inputs (json)
        required: true
jobs:
  run:
    name: Run workflow ${{ github.event.inputs.workflow_name }}
    runs-on: ubuntu-latest
    steps:
      - name: Running ${{ inputs.workflow_name }}
        run: |
          secret_stk_login=$(echo '${{ inputs.secrets }}' | jq -cr '.cli_token')
          execution_id=$(echo '${{ inputs.api_inputs }}' | jq -cr '.execution_id')

          http_code=$(curl -s -o script.sh -w '%{http_code}' https://workflow-api.v1.stackspot.com/workflows/$execution_id --header "Authorization: Bearer $secret_stk_login";)
          if [[ "$http_code" -ne "200" ]]; then
              echo "------------------------------------------------------------------------------------------"
              echo "---------------------------------------- Debug Starting ----------------------------------"
              echo "------------------------------------------------------------------------------------------"

              echo "HTTP_CODE:" $http_code
              echo "RESPONSE_CONTENT:"
              cat script.sh
              exit $http_code

              echo "------------------------------------------------------------------------------------------"
              echo "---------------------------------------- Debug Ending ------------------------------------"
              echo "------------------------------------------------------------------------------------------"
          else
              chmod +x script.sh

              echo "------------------------------------------------------------------------------------------"
              echo "---------------------------------------- Starting ----------------------------------------"
              echo "------------------------------------------------------------------------------------------"

              bash script.sh

              echo "------------------------------------------------------------------------------------------"
              echo "----------------------------------------  Ending  ----------------------------------------"
              echo "------------------------------------------------------------------------------------------"

          fi
Step 3. Commit the changes running the commands:
git init
git remote add origin https://github.com/<github-username>/<repository-name>.git
git add .
git commit -m "Setup Runner"
git push
See an example:
git init
git remote add origin https://github.com/my-organization/repo-runner-actions.git
git add .
git commit -m "Setup Runner"
git push
In some SCMs, the Project Name and Repository Name can mean the same thing. Check below how to identify those fields in the URL:
https://github.com/[GITHUB-USERNAME]/[REPOSITORY-NAME]
Example:
https://github.com/stack-spot/stackspot-workflows-action
Step 4. Set up a Webhook in the repository you created. Follow the instructions below:
- Access your GitHub account and login;
- On the top right menu, click on your photo and then on 'Your repositories';
- Click on the repository created to run the pipelines and then, on the top menu, click on 'Settings';
- On the left side menu, click on Webhooks and then on the Add webhook button;
- Fill in the fields with the following information:
- Payload: Fill in the address:
https://workflow-api.v1.stackspot.com/workflows/github/callback; - Content type: Select the
application/jsonoption; - Secret: --- (Do not fill in);
- SSL Verification: Check the option 'Enable SSL verification';
- Which events would you like to trigger this webhook? Select the answer 'Let me select individual events':
- A checkbox list will be loaded, check the 'Workflow runs' option;
- Check the option 'Active';
- Finally, click the 'Add webhook' button.

If the setup was successful, the next step is to integrate GitHub with your StackSpot account.
Integrate GitHub with StackSpot
You will follow the steps below on StackSpot Platform.
Configure via GitHub PAT (Personal Access Token)
Step 1. Log in to the StackSpot Platform. On the upper left side of the screen, click on the selector button and select the Account option;
Step 2. On the left side menu, in the Settings section, click on 'SCM Integration'. Then click on 'Configure SCM Integration';
Step 3. On the 'Select a provider' field, choose Github;
Step 4. On Authentication method, select PAT (Personal Access Token). Fill out the fields:
- Username: Your username on Github;
- Token: Use the Personal Access Token you generated before.
Step 5. In 'Workflow configuration' choose how your organization wants to manage the SCM access. Answer the 'Will the organization manage access to the SCM via User PAT?' question:
- Enable the button next to the phrase. This is for the user to manage access to the SCM via PAT (Personal Access Token).
- Disable button: This is for the organization to manage the SCM access.
By enabling this button, your account members must configure their individual SCM Access.
Step 6. On the Workflow URL, add the created repository with the pipelines so Stackspot can identify where your workflow is configured.
For example: https://github.com/my-organization/repo-runner-actions.
Step 7. Check the Review screen. Check your information and click on 'Integrate with Stackspot'.
Done! You configuration is complete.
Find below the steps for both options:
1. Configure via GitHub App
Before you begin:
You must create a GitHub App if you don't have one. To learn how to create it, access GitHub official documentation.
On GitHub, after creating the App, grant the following access:
-
Access the menu 'Settings > Developer settings > GitHub Apps';
-
Locate your App and click the 'Edit' button;
-
Click on the 'Permissions & events' menu and then, 'Repository permissions' menu;
-
In the action list, grant 'Read and write' permission to the items below and save the changes:
- Contents;
- Pull requests.

If your App creates workflows, you need to grant 'Read and write' permission to 'Workflows':

If your App needs to access Actions to manipulate workflows, workflow runs or artifacts, you need to grant 'Read and write' permission to 'Actions':

You must grant access to each resource that your App needs.
After installing the App in your Account or Organization, select the repositories you want to work with StackSpot.
-
On GitHub, access the menu 'Settings > Applications';
-
Locate your App and click the 'Configure' button;
-
In the 'Repository access' menu, check the 'Only select repositories' option and select the repositories you want to work with StackSpot.

After you create it, follow the steps below:
Step 1. Log in to StackSpot Platform and access the Account menu;
Step 2. On the left side menu, in the Settings section, click on 'SCM Integration'. Then click on 'Add SCM Integration';
Step 3. On the Select a provider section, choose GitHub;
Step 4. On Authentication method, select GitHub APP. Fill out the fields with the information below:
- AppID: Application ID. For example,
145236. - InstallerID: APP installation ID, found at the end of the URL, for example, URL:
https://github.com/settings/installations/88969132, the InstallerID will be the value:88969132.
You can access the information your need to fill out the GitHub App fields. Check:
-
For users: Go to Settings > Applications > Your GitHub App. Find the information on the side menu options: General, Permissions & Events, Install App, Advanced e Optional features.
-
For organizations: Go to Settings > Installed GitHub Apps. Find the information on the side menu options: General, Permissions & Events, Install App, Advanced e Optional features.
Step 5. Upload the .pem file of the Private Key and click on 'Next Step';
Step 6. In 'Workflow configuration' disable the 'Will the organization manage access to the SCM via User PAT?' option.
By enabling this button, your account members must configure their individual SCM Access.
Step 7. On the Workflow URL, add the created repository with the pipelines so StackSpot can identify where your workflow is configured.
For example: https://github.com/my-organization/repo-runner-actions.
Step 8. You will see a Review screen. Check the details and click on 'Integrate with StackSpot';
Done! Your configuration is complete.